


Tag Archives: c-sharp
C# || How To Construct A Binary Search Tree From Preorder Traversal Using C#

The following is a module with functions which demonstrates how to construct a binary search tree from preorder traversal using C#.
1. Binary Tree From Preorder – Problem Statement
Given an array of integers preorder, which represents the preorder traversal of a BST (i.e., binary search tree), construct the tree and return its root.
It is guaranteed that there is always possible to find a binary search tree with the given requirements for the given test cases.
A binary search tree is a binary tree where for every node, any descendant of Node.left has a value strictly less than Node.val, and any descendant of Node.right has a value strictly greater than Node.val.
A preorder traversal of a binary tree displays the value of the node first, then traverses Node.left, then traverses Node.right.
Example 1:
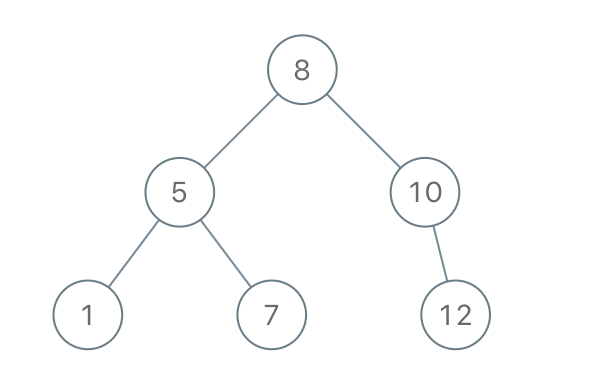
Input: preorder = [8,5,1,7,10,12]

Output: [8,5,10,1,7,null,12]
Example 2:
Input: preorder = [1,3]

Output: [1,null,3]
2. Binary Tree From Preorder – Solution
The following is a solution which demonstrates how to construct a binary search tree from preorder traversal.
|
1 2 3 4 5 6 7 8 9 10 11 12 13 14 15 16 17 18 19 20 21 22 23 24 25 26 27 28 29 30 31 32 33 34 35 36 37 38 39 |
// ============================================================================ // Author: Kenneth Perkins // Date: Oct 16, 2021 // Taken From: http://programmingnotes.org/ // File: Solution.cs // Description: Demonstrates how to construct a BST from preorder traversal // ============================================================================ /** * Definition for a binary tree node. * public class TreeNode { * public int val; * public TreeNode left; * public TreeNode right; * public TreeNode(int val=0, TreeNode left=null, TreeNode right=null) { * this.val = val; * this.left = left; * this.right = right; * } * } */ public class Solution { private int currentIndex = 0; public TreeNode BstFromPreorder(int[] preorder) { return BuildBST(preorder, int.MaxValue); } TreeNode BuildBST(int[] preorder, int parentValue) { if (currentIndex == preorder.Length || preorder[currentIndex] > parentValue) { return null; } var currentValue = preorder[currentIndex++]; var node = new TreeNode(currentValue); node.left = BuildBST(preorder, currentValue); node.right = BuildBST(preorder, parentValue); return node; } }// http://programmingnotes.org/ |
QUICK NOTES:
The highlighted lines are sections of interest to look out for.
The code is heavily commented, so no further insight is necessary. If you have any questions, feel free to leave a comment below.
Once compiled, you should get this as your output for the example cases:
[8,5,10,1,7,null,12]

[1,null,3]
C# || How To Find The Next Greater Element In A Circular Array Using C#

The following is a module with functions which demonstrates how to find the next greater element in a circular array using C#.
1. Circular Next Greater – Problem Statement
Given a circular integer array nums (i.e., the next element of nums[nums.length – 1] is nums[0]), return the next greater number for every element in nums.
The next greater number of a number x is the first greater number to its traversing-order next in the array, which means you could search circularly to find its next greater number. If it doesn’t exist, return -1 for this number.
Example 1:
Input: nums = [1,2,1]

Output: [2,-1,2]

Explanation: The first 1's next greater number is 2;

The number 2 can't find next greater number.

The second 1's next greater number needs to search circularly, which is also 2.
Example 2:
Input: nums = [1,2,3,4,3]

Output: [2,3,4,-1,4]
2. Circular Next Greater – Solution
The following is a solution which demonstrates how to find the next greater element in a circular array.
This solution uses the monotonic stack approach. This solution finds the next greater element for each array value, in the first pass, and then uses a second pass to process any remaining values since the array is circular.
|
1 2 3 4 5 6 7 8 9 10 11 12 13 14 15 16 17 18 19 20 21 22 23 24 25 26 27 28 29 30 31 32 33 34 35 36 37 38 39 40 41 42 43 |
// ============================================================================ // Author: Kenneth Perkins // Date: Oct 15, 2021 // Taken From: http://programmingnotes.org/ // File: Solution.cs // Description: Demonstrates how to find the next greater element in a // circular array // ============================================================================ public class Solution { public int[] NextGreaterElements(int[] nums) { var result = GetNextGreatest(nums); return result; } public int[] GetNextGreatest(int[] nums) { var result = new int[nums.Length]; var stack = new Stack<int>(); for (int index = 0; index < nums.Length; ++index) { // Default to -1 for this index result[index] = -1; // Fill in values that have a greater element while (stack.Count > 0 && nums[stack.Peek()] < nums[index]) { result[stack.Peek()] = nums[index]; stack.Pop(); } // Add index to stack stack.Push(index); } // Fill in any left over values since this is circular for (int index = 0; index < nums.Length && stack.Count > 0; ++index) { while (stack.Count > 0 && nums[stack.Peek()] < nums[index]) { result[stack.Peek()] = nums[index]; stack.Pop(); } } return result; } }// http://programmingnotes.org/ |
QUICK NOTES:
The highlighted lines are sections of interest to look out for.
The code is heavily commented, so no further insight is necessary. If you have any questions, feel free to leave a comment below.
Once compiled, you should get this as your output for the example cases:
[2,-1,2]

[2,3,4,-1,4]
C# || How To Find The Next Greater Element In An Array Using C#
The following is a module with functions which demonstrates how to find the next greater element in an array using C#.
1. Next Greater – Problem Statement
The next greater element of some element x in an array is the first greater element that is to the right of x in the same array.
You are given two distinct 0-indexed integer arrays nums1 and nums2, where nums1 is a subset of nums2.
For each 0 <= i < nums1.length, find the index j such that nums1[i] == nums2[j] and determine the next greater element of nums2[j] in nums2. If there is no next greater element, then the answer for this query is -1.
Return an array ans of length nums1.length such that ans[i] is the next greater element as described above.
Example 1:
Input: nums1 = [4,1,2], nums2 = [1,3,4,2]

Output: [-1,3,-1]

Explanation: The next greater element for each value of nums1 is as follows:

- 4 is underlined in nums2 = [1,3,4,2]. There is no next greater element, so the answer is -1.

- 1 is underlined in nums2 = [1,3,4,2]. The next greater element is 3.

- 2 is underlined in nums2 = [1,3,4,2]. There is no next greater element, so the answer is -1.
Example 2:
Input: nums1 = [2,4], nums2 = [1,2,3,4]

Output: [3,-1]

Explanation: The next greater element for each value of nums1 is as follows:

- 2 is underlined in nums2 = [1,2,3,4]. The next greater element is 3.

- 4 is underlined in nums2 = [1,2,3,4]. There is no next greater element, so the answer is -1.
2. Next Greater – Solution
The following is a solution which demonstrates how to find the next greater element in an array.
This solution uses the monotonic stack approach. This solution finds the next greater element for each array value in the second array, and uses that to find the next greater element for each matching value in the first array.
To determine the next greatest element, a stack is used to keep track of the items we’ve already seen. The array index of the item is saved to the stack.
For each loop iteration, the item at the top of the stack is checked to see if it is less than the current array item being checked. If the item at the top of the stack is less than the current array item, then the current array item is saved to the result index that matches the value from the top of the stack.
Once the next greatest elements have been found from nums2, that information is used to populate the final result from the matching values found in nums1
|
1 2 3 4 5 6 7 8 9 10 11 12 13 14 15 16 17 18 19 20 21 22 23 24 25 26 27 28 29 30 31 32 33 34 35 36 37 38 39 40 41 42 43 44 45 46 47 48 49 50 51 52 |
// ============================================================================ // Author: Kenneth Perkins // Date: Oct 14, 2021 // Taken From: http://programmingnotes.org/ // File: Solution.cs // Description: Demonstrates how to find the next greater element in an array // ============================================================================ public class Solution { public int[] NextGreaterElement(int[] nums1, int[] nums2) { // For each element in nums2, get the next greatest element var nums2NextGreatest = GetNextGreatest(nums2); // Create a dictionary with the next greatest of each element from nums2 var seen = new Dictionary<int, int>(); for (int index = 0; index < nums2.Length; ++index) { seen[nums2[index]] = nums2NextGreatest[index]; } // From the items in the dictionary, populate the results var result = new int[nums1.Length]; for (int index = 0; index < nums1.Length; ++index) { result[index] = seen[nums1[index]]; } return result; } public int[] GetNextGreatest(int[] nums) { // Create a stack that keeps track of the item and its index var stack = new Stack<int>(); var result = new int[nums.Length]; // Go through array and find the next greatest value for (int index = 0; index < nums.Length; ++index) { // Default the value at index to -1 result[index] = -1; // Check to see if the item at the top of the stack is less than current item while (stack.Count > 0 && nums[stack.Peek()] < nums[index]) { // Save the current item at the result index result[stack.Peek()] = nums[index]; stack.Pop(); } // Save array index to the stack stack.Push(index); } return result; } }// http://programmingnotes.org/ |
QUICK NOTES:
The highlighted lines are sections of interest to look out for.
The code is heavily commented, so no further insight is necessary. If you have any questions, feel free to leave a comment below.
Once compiled, you should get this as your output for the example cases:
[-1,3,-1]

[3,-1]
C# || How To Multiply Two Strings Using C#
The following is a module with functions which demonstrates how to multiply two strings together using C#.
1. Multiply Strings – Problem Statement
Given two non-negative integers num1 and num2 represented as strings, return the product of num1 and num2, also represented as a string.
Note: You must not use any built-in BigInteger library or convert the inputs to integer directly.
Example 1:
Input: num1 = "2", num2 = "3"

Output: "6"
Example 2:
Input: num1 = "123", num2 = "456"

Output: "56088"
2. Multiply Strings – Solution
The following is a solution which demonstrates how to multiply two strings together.
This solution starts from the end of both strings and multiplies each individual number, keeping track of any carryovers. The result of each operation is stored in a ‘solution’ array, and when the operation is complete, the result is returned as a string.
|
1 2 3 4 5 6 7 8 9 10 11 12 13 14 15 16 17 18 19 20 21 22 23 24 25 26 27 28 29 30 31 32 33 34 35 36 37 38 39 40 41 42 43 44 45 46 47 48 49 50 51 52 53 54 55 56 57 58 59 60 61 |
// ============================================================================ // Author: Kenneth Perkins // Date: Oct 13, 2021 // Taken From: http://programmingnotes.org/ // File: Solution.cs // Description: Demonstrates how to multiply two strings together // ============================================================================ public class Solution { public string Multiply(string num1, string num2) { if (num1 == "0" || num2 == "0") { return "0"; } // This will be the max number of digits var solution = new int[num1.Length + num2.Length]; // Loop through both strings from the end for (int num1Index = num1.Length -1; num1Index >= 0; --num1Index) { for (int num2Index = num2.Length -1; num2Index >= 0; --num2Index) { // Get the current solution index var currentIndex = num1Index + num2Index + 1; // Multiply the two numbers var value = CharToInt(num1[num1Index]) * CharToInt(num2[num2Index]); // Add the value to the result at the current index solution[currentIndex] += value; // Check to see if there is any carry to be removed if (solution[currentIndex] > 9) { // Add the carry to the 'previous' index var carry = solution[currentIndex] / 10; solution[currentIndex - 1] += carry; // Remove the carry from the current index var digit = solution[currentIndex] % 10; solution[currentIndex] = digit; } } } // Skip over leading zeroes var zeroIndex = 0; while (zeroIndex < solution.Length && solution[zeroIndex] == 0) { ++zeroIndex; } // Convert to string and return var result = new StringBuilder(); for (int index = zeroIndex; index < solution.Length; ++index) { result.Append(solution[index]); } return result.ToString(); } public int CharToInt(char ch) { return ch - '0'; } }// http://programmingnotes.org/ |
QUICK NOTES:
The highlighted lines are sections of interest to look out for.
The code is heavily commented, so no further insight is necessary. If you have any questions, feel free to leave a comment below.
Once compiled, you should get this as your output for the example cases:
"6"

"56088"
C# || How To Add Two Binary Strings Using C#
The following is a module with functions which demonstrates how to add two binary strings together using C#.
1. Add Binary – Problem Statement
Given two binary strings a and b, return their sum as a binary string.
Example 1:
Input: a = "11", b = "1"

Output: "100"
Example 2:
Input: a = "1010", b = "1011"

Output: "10101"
2. Add Binary – Solution
The following is a solution which demonstrates how to add two binary strings together.
In this solution, we start at the end of both strings, and perform basic math on each number, adding them together. If any mathematical carry over is required, that is added to the next loop iteration.
|
1 2 3 4 5 6 7 8 9 10 11 12 13 14 15 16 17 18 19 20 21 22 23 24 25 26 27 28 29 30 31 32 33 34 35 36 37 38 39 40 41 42 43 44 45 46 47 48 49 50 51 52 53 54 55 56 57 |
// ============================================================================ // Author: Kenneth Perkins // Date: Oct 13, 2021 // Taken From: http://programmingnotes.org/ // File: Solution.cs // Description: Demonstrates how to add two binary strings together // ============================================================================ public class Solution { public string AddBinary(string a, string b) { // Process numbers starting from the end var aLength = a.Length - 1; var bLength = b.Length - 1; // Go through data and add each number together var stack = new Stack<int>(); var carry = 0; while (aLength >= 0 || bLength >= 0) { var aValue = 0; var bValue = 0; if (aLength >= 0) { aValue = CharToInt(a[aLength--]); } if (bLength >= 0) { bValue = CharToInt(b[bLength--]); } // Add the a and b values together, including carry var sum = carry + aValue + bValue; // Determine the carry over value carry = sum / 2; // Save the digit var digit = sum % 2; stack.Push(digit); } // Add any data left over if (carry > 0) { stack.Push(carry); } // Save results var result = new StringBuilder(); while (stack.Count > 0) { result.Append(stack.Peek()); stack.Pop(); } return result.ToString(); } private int CharToInt(char ch) { return ch - '0'; } }// http://programmingnotes.org/ |
QUICK NOTES:
The highlighted lines are sections of interest to look out for.
The code is heavily commented, so no further insight is necessary. If you have any questions, feel free to leave a comment below.
Once compiled, you should get this as your output for the example cases:
"100"

"10101"
C# || How To Traverse A Binary Tree Postorder Using C#

The following is a module with functions which demonstrates how to traverse a binary tree post order using C#.
1. Binary Tree Traversal – Problem Statement
Given the root of a binary tree, return the postorder traversal of its nodes’ values.
Example 1:

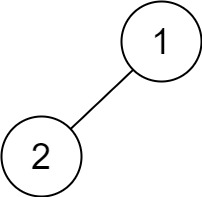
Input: root = [1,null,2,3]

Output: [3,2,1]
Example 2:
Input: root = []

Output: []
Example 3:
Input: root = [1]

Output: [1]
Example 4:
Input: root = [1,2]

Output: [2,1]
Example 5:
Input: root = [1,null,2]

Output: [2,1]
2. Binary Tree Traversal – Solution
The following is a solution which demonstrates how to traverse a binary tree post order.
|
1 2 3 4 5 6 7 8 9 10 11 12 13 14 15 16 17 18 19 20 21 22 23 24 25 26 27 28 29 30 31 32 33 34 35 36 37 38 39 40 |
// ============================================================================ // Author: Kenneth Perkins // Date: Oct 13, 2021 // Taken From: http://programmingnotes.org/ // File: Solution.cs // Description: Demonstrates how to traverse a binary tree post order // ============================================================================ /** * Definition for a binary tree node. * public class TreeNode { * public int val; * public TreeNode left; * public TreeNode right; * public TreeNode(int val=0, TreeNode left=null, TreeNode right=null) { * this.val = val; * this.left = left; * this.right = right; * } * } */ public class Solution { private List<int> result = new List<int>(); public IList<int> PostorderTraversal(TreeNode root) { Traverse(root); return result; } public void Traverse(TreeNode node) { if (node == null) { return; } Traverse(node.left); Traverse(node.right); result.Add(node.val); } }// http://programmingnotes.org/ |
QUICK NOTES:
The highlighted lines are sections of interest to look out for.
The code is heavily commented, so no further insight is necessary. If you have any questions, feel free to leave a comment below.
Once compiled, you should get this as your output for the example cases:
[3,2,1]

[]

[1]

[2,1]

[2,1]
C# || How To Traverse A Binary Tree Preorder Using C#
The following is a module with functions which demonstrates how to traverse a binary tree pre order using C#.
1. Binary Tree Traversal – Problem Statement
Given the root of a binary tree, return the preorder traversal of its nodes’ values.
Example 1:
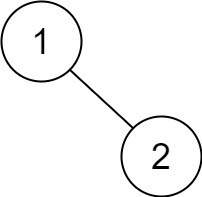
Input: root = [1,null,2,3]

Output: [1,2,3]
Example 2:
Input: root = []

Output: []
Example 3:
Input: root = [1]

Output: [1]
Example 4:

Input: root = [1,2]

Output: [1,2]
Example 5:

Input: root = [1,null,2]

Output: [1,2]
2. Binary Tree Traversal – Solution
The following is a solution which demonstrates how to traverse a binary tree pre order.
|
1 2 3 4 5 6 7 8 9 10 11 12 13 14 15 16 17 18 19 20 21 22 23 24 25 26 27 28 29 30 31 32 33 34 35 36 37 38 39 40 |
// ============================================================================ // Author: Kenneth Perkins // Date: Oct 13, 2021 // Taken From: http://programmingnotes.org/ // File: Solution.cs // Description: Demonstrates how to traverse a binary tree pre order // ============================================================================ /** * Definition for a binary tree node. * public class TreeNode { * public int val; * public TreeNode left; * public TreeNode right; * public TreeNode(int val=0, TreeNode left=null, TreeNode right=null) { * this.val = val; * this.left = left; * this.right = right; * } * } */ public class Solution { private List<int> result = new List<int>(); public IList<int> PreorderTraversal(TreeNode root) { Traverse(root); return result; } public void Traverse(TreeNode node) { if (node == null) { return; } result.Add(node.val); Traverse(node.left); Traverse(node.right); } }// http://programmingnotes.org/ |
QUICK NOTES:
The highlighted lines are sections of interest to look out for.
The code is heavily commented, so no further insight is necessary. If you have any questions, feel free to leave a comment below.
Once compiled, you should get this as your output for the example cases:
[1,2,3]

[]

[1]

[1,2]

[1,2]
C# || How To Traverse A Binary Tree Inorder Using C#
The following is a module with functions which demonstrates how to traverse a binary tree in order using C#.
1. Binary Tree Traversal – Problem Statement
Given the root of a binary tree, return the inorder traversal of its nodes’ values.
Example 1:
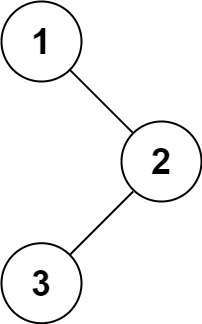
Input: root = [1,null,2,3]

Output: [1,3,2]
Example 2:
Input: root = []

Output: []
Example 3:
Input: root = [1]

Output: [1]
Example 4:
Input: root = [1,2]

Output: [2,1]
Example 5:
Input: root = [1,null,2]

Output: [1,2]
2. Binary Tree Traversal – Solution
The following is a solution which demonstrates how to traverse a binary tree in order.
|
1 2 3 4 5 6 7 8 9 10 11 12 13 14 15 16 17 18 19 20 21 22 23 24 25 26 27 28 29 30 31 32 33 34 35 36 37 38 39 40 |
// ============================================================================ // Author: Kenneth Perkins // Date: Oct 13, 2021 // Taken From: http://programmingnotes.org/ // File: Solution.cs // Description: Demonstrates how to traverse a binary tree in order // ============================================================================ /** * Definition for a binary tree node. * public class TreeNode { * public int val; * public TreeNode left; * public TreeNode right; * public TreeNode(int val=0, TreeNode left=null, TreeNode right=null) { * this.val = val; * this.left = left; * this.right = right; * } * } */ public class Solution { private List<int> result = new List<int>(); public IList<int> InorderTraversal(TreeNode root) { Traverse(root); return result; } public void Traverse(TreeNode node) { if (node == null) { return; } Traverse(node.left); result.Add(node.val); Traverse(node.right); } }// http://programmingnotes.org/ |
QUICK NOTES:
The highlighted lines are sections of interest to look out for.
The code is heavily commented, so no further insight is necessary. If you have any questions, feel free to leave a comment below.
Once compiled, you should get this as your output for the example cases:
[1,3,2]

[]

[1]

[2,1]

[1,2]
C# || How To Determine The Maximum Units On A Truck Using C#
The following is a module with functions which demonstrates how to determine the maximum units on a truck using C#.
1. Maximum Units – Problem Statement
You are assigned to put some amount of boxes onto one truck. You are given a 2D array boxTypes, where boxTypes[i] = [numberOfBoxes, numberOfUnitsPerBox]:
• numberOfBoxes is the number of boxes of type i.

• numberOfUnitsPerBox is the number of units in each box of the type i
You are also given an integer truckSize, which is the maximum number of boxes that can be put on the truck. You can choose any boxes to put on the truck as long as the number of boxes does not exceed truckSize.
Return the maximum total number of units that can be put on the truck.
Example 1:
Input: boxTypes = [[1,3],[2,2],[3,1]], truckSize = 4

Output: 8

Explanation: There are:

- 1 box of the first type that contains 3 units.

- 2 boxes of the second type that contain 2 units each.

- 3 boxes of the third type that contain 1 unit each.

You can take all the boxes of the first and second types, and one box of the third type.

The total number of units will be = (1 * 3) + (2 * 2) + (1 * 1) = 8.
Example 2:
Input: boxTypes = [[5,10],[2,5],[4,7],[3,9]], truckSize = 10

Output: 91
2. Maximum Units – Solution
The following is a solution which demonstrates how to determine the maximum units on a truck.
In this solution, we start with the box with the most units. The box types are sorted by the number of units per box in descending order. Then, the box types are iterated over, taking from each type as many as possible.
|
1 2 3 4 5 6 7 8 9 10 11 12 13 14 15 16 17 18 19 20 21 22 23 24 25 26 27 28 29 30 31 32 33 34 35 36 37 38 39 40 41 42 43 44 45 46 |
// ============================================================================ // Author: Kenneth Perkins // Date: Oct 13, 2021 // Taken From: http://programmingnotes.org/ // File: Solution.cs // Description: Determines the maximum units you can put on a truck // ============================================================================ public class Solution { public int MaximumUnits(int[][] boxTypes, int truckSize) { var result = 0; // Sort the box types by number of units per box in descending order Array.Sort(boxTypes, (a, b) => { return b[1] - a[1]; }); // Determine how many units can be added to the truck var remainingSize = truckSize; foreach (var type in boxTypes) { // Get the box count and units per box var boxCount = type[0]; var unitsPerBox = type[1]; // Check to see if theres enough room to add more boxes var adjustedBoxCount = 0; if (remainingSize - boxCount > 0) { adjustedBoxCount = boxCount; // All boxes can be added } else { adjustedBoxCount = remainingSize; // Only the remaining amount can be added } // Add the units to the result result += adjustedBoxCount * unitsPerBox; // Adjust remaining truck size with the added boxes remainingSize -= adjustedBoxCount; // Exit if there is no more room remaining if (remainingSize == 0) { break; } } return result; } }// http://programmingnotes.org/ |
QUICK NOTES:
The highlighted lines are sections of interest to look out for.
The code is heavily commented, so no further insight is necessary. If you have any questions, feel free to leave a comment below.
Once compiled, you should get this as your output for the example cases:
8

91
C# || Word Search – How To Search A Grid Matrix For A Target Word Using C#
The following is a module with functions which demonstrates how to search a grid matrix for a target word using C#.
1. Word Search – Problem Statement
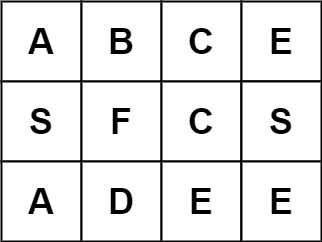
Given an m x n grid of characters board and a string word, return true if word exists in the grid.
The word can be constructed from letters of sequentially adjacent cells, where adjacent cells are horizontally or vertically neighboring. The same letter cell may not be used more than once.
Example 1:
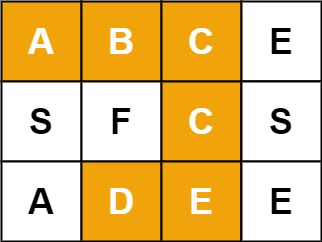
Input: board = [["A","B","C","E"],["S","F","C","S"],["A","D","E","E"]], word = "ABCCED"

Output: true
Example 2:
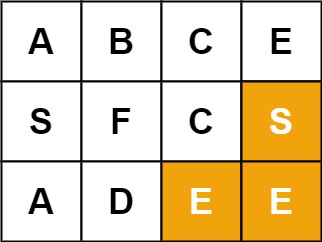
Input: board = [["A","B","C","E"],["S","F","C","S"],["A","D","E","E"]], word = "SEE"

Output: true
Example 3:
Input: board = [["A","B","C","E"],["S","F","C","S"],["A","D","E","E"]], word = "ABCB"

Output: false
2. Word Search – Solution
The following is a solution which demonstrates how to search a grid matrix for a target word. This solution uses Depth First Search.
Depth First Search (DFS) is an algorithm for searching tree or graph data structures. It starts at the root node and explores as far as possible along each branch before backtracking.
In this problem we start at the root node and search all the possibilities at each array index until a match is found. We create a ‘visited’ array to keep track of the indexes already seen.
|
1 2 3 4 5 6 7 8 9 10 11 12 13 14 15 16 17 18 19 20 21 22 23 24 25 26 27 28 29 30 31 32 33 34 35 36 37 38 39 40 41 42 43 44 45 46 47 48 49 50 51 52 53 54 55 56 57 58 59 60 61 62 63 64 65 66 |
// ============================================================================ // Author: Kenneth Perkins // Date: Oct 11, 2021 // Taken From: http://programmingnotes.org/ // File: Solution.cs // Description: Determines if a word can be constructed from letters in a grid // ============================================================================ public class Solution { public bool Exist(char[][] board, string word) { // Create a 2D bool 'visited' node matrix to keep track of the // items we've already seen var rowsVisited = new bool[board.Length][]; for (int rowIndex = 0; rowIndex < board.Length; ++rowIndex) { rowsVisited[rowIndex] = new bool[board[rowIndex].Length]; } // Start at the root node and explore as far as possible along each branch for (int rowIndex = 0; rowIndex < board.Length; ++rowIndex) { for (int colIndex = 0; colIndex < board[rowIndex].Length; ++colIndex) { if (DFS(board, rowIndex, colIndex, 0, word, rowsVisited)) { return true; } } } return false; } private bool DFS(char[][] board, int row, int col, int searchIndex, string word, bool[][] rowsVisited) { // This is the success case if (searchIndex >= word.Length) { return true; } // Make sure the search parameters are in bounds if (row < 0 || row >= board.Length || col < 0 || col >= board[row].Length) { return false; } if (rowsVisited[row][col]) { return false; } if (board[row][col] != word[searchIndex]) { return false; } // Mark that this row has been visited rowsVisited[row][col] = true; var searchResult = // Search left DFS(board, row, col - 1, searchIndex + 1, word, rowsVisited) || // Search right DFS(board, row, col + 1, searchIndex + 1, word, rowsVisited) || // Search top DFS(board, row - 1, col, searchIndex + 1, word, rowsVisited) || // Search bottom DFS(board, row + 1, col, searchIndex + 1, word, rowsVisited); // Unmark that this row has been visited rowsVisited[row][col] = false; return searchResult; } }// http://programmingnotes.org/ |
QUICK NOTES:
The highlighted lines are sections of interest to look out for.
The code is heavily commented, so no further insight is necessary. If you have any questions, feel free to leave a comment below.
Once compiled, you should get this as your output for the example cases:
true

true

false
C# || How To Find All Combinations Of Well-Formed Brackets Using C#
The following is a program with functions which demonstrates how to find all combinations of well-formed brackets using C#.
The task is to write a function Brackets(int n) that prints all combinations of well-formed brackets from 1…n. For example, Brackets(3), the output would be:
()

(())  ()()

((()))  (()())  (())()  ()(())  ()()()
The number of possible combinations is the Catalan number of N pairs C(n).
1. Find All Well-Formed Brackets
The example below demonstrates the use of the ‘Brackets‘ function to find all the well-formed bracket combinations.
|
1 2 3 4 5 6 7 8 9 10 11 12 13 14 15 16 17 18 19 20 21 22 23 24 25 26 27 28 29 30 31 32 33 34 35 36 37 38 39 40 41 42 43 44 45 46 47 48 49 50 51 52 53 54 55 56 57 58 59 60 61 62 63 64 65 66 67 |
// ============================================================================ // Author: Kenneth Perkins // Date: Sep 1, 2021 // Taken From: http://programmingnotes.org/ // File: Program.cs // Description: Generate all combinations of well-formed brackets from 1…n // ============================================================================ using System; using System.Collections.Generic; public class Program { static void Main(string[] args) { var results = Brackets(4); foreach (var result in results) { Console.WriteLine("Pair: " + result.pair + ", Combination: " + result.combination); } Console.ReadLine(); } /// <summary> /// Returns all combinations of well-formed brackets from 1...n /// </summary> /// <param name="pairs">The number of bracket combinations to generate</param> /// <param name="open">Optional. The 'open bracket' symbol</param> /// <param name="close">Optional. The 'close bracket' symbol</param> /// <returns>A List of bracket combination info</returns> public static List<Result> Brackets(int pairs, string open = "(", string close = ")") { var results = new List<Result>(); var symbols = new Symbols { open = open, close = close }; for (int pair = 1; pair <= pairs; ++pair) { var result = new Result { pair = pair, combination = BuildBrackets("", 0, 0, pair, symbols) }; results.Add(result); } return results; } public static string BuildBrackets(string output, int open, int close, int pair, Symbols symbols) { if ((open == pair) && (close == pair)) { return output; } string result = ""; if (open < pair) { string openCombo = BuildBrackets(output + symbols.open, open + 1, close, pair, symbols); if (openCombo.Length > 0) { result += (result.Length > 0 ? ", " : "") + openCombo; } } if (close < open) { string closeCombo = BuildBrackets(output + symbols.close, open, close + 1, pair, symbols); if (closeCombo.Length > 0) { result += (result.Length > 0 ? ", " : "") + closeCombo; } } return result; } public class Result { public int pair { get; set; } public string combination { get; set; } } public class Symbols { public string open { get; set; } public string close { get; set; } } }// http://programmingnotes.org/ |
QUICK NOTES:
The highlighted lines are sections of interest to look out for.
The code is heavily commented, so no further insight is necessary. If you have any questions, feel free to leave a comment below.
Once compiled, you should get this as your output
Pair: 1, Combination: ()

Pair: 2, Combination: (()), ()()

Pair: 3, Combination: ((())), (()()), (())(), ()(()), ()()()

Pair: 4, Combination: (((()))), ((()())), ((())()), ((()))(), (()(())), (()()()), (()())(), (())(()), (())()(), ()((())), ()(()()), ()(())(), ()()(()), ()()()()
C# || How To Pad Center & Center Align A String Of Fixed Length Using C#
The following is a module with functions which demonstrates how to pad center and center align a string of a fixed length using C#.
The function demonstrated on this page center aligns the characters in a string by padding them on the left and right with a specified character, of a specified total length.
The returned string is padded with as many padding characters needed to reach a length of the specified total width.
The padding character is user defined, but if no padding character is specified, the string is padded using a whitespace (‘ ‘).
1. Pad Center
The example below demonstrates the use of ‘Utils.Extensions.PadCenter‘ to center align a string of a fixed length.
In this example, the default padding character is used to pad the string, which is a whitespace (‘ ‘).
|
1 2 3 4 5 6 7 8 9 10 11 12 13 14 15 16 17 18 19 20 21 22 23 |
// Pad Center using Utils; // Declare string string original = "<-Kenneth->"; // Get padding width int width = 15; // Display result Console.WriteLine("Original: '" + original + "'"); Console.WriteLine("Pad Center: '" + original.PadCenter(width) + "'"); Console.WriteLine("Pad Right: '" + original.PadRight(width) + "'"); Console.WriteLine("Pad Left: '" + original.PadLeft(width) + "'"); // expected output: /* Original: '<-Kenneth->' Pad Center: ' <-Kenneth-> ' Pad Right: '<-Kenneth-> ' Pad Left: ' <-Kenneth->' */ |
2. Utils Namespace
The following is the Utils Namespace. Include this in your project to start using!
|
1 2 3 4 5 6 7 8 9 10 11 12 13 14 15 16 17 18 19 20 21 22 23 24 25 26 27 28 |
// ============================================================================ // Author: Kenneth Perkins // Date: Jul 28, 2021 // Taken From: http://programmingnotes.org/ // File: Utils.cs // Description: Handles general utility functions // ============================================================================ using System; namespace Utils { public static class Extensions { /// <summary> /// Returns a new string that center aligns the characters in a /// string by padding them on the left and right with a specified /// character, of a specified total length /// </summary> /// <param name="source">The source string</param> /// <param name="totalWidth">The number of characters to pad the source string</param> /// <param name="paddingChar">The padding character</param> /// <returns>The modified source string padded with as many paddingChar /// characters needed to create a length of totalWidth</returns> public static string PadCenter(this string source, int totalWidth, char paddingChar = ' ') { int spaces = totalWidth - source.Length; int padLeft = spaces / 2 + source.Length; return source.PadLeft(padLeft, paddingChar).PadRight(totalWidth, paddingChar); } } }// http://programmingnotes.org/ |
3. More Examples
Below are more examples demonstrating the use of the ‘Utils‘ Namespace. Don’t forget to include the module when running the examples!
|
1 2 3 4 5 6 7 8 9 10 11 12 13 14 15 16 17 18 19 20 21 22 23 24 25 26 27 28 29 30 31 32 33 34 35 36 37 |
// ============================================================================ // Author: Kenneth Perkins // Date: Jul 28, 2021 // Taken From: http://programmingnotes.org/ // File: Program.cs // Description: The following demonstrates the use of the Utils Namespace // ============================================================================ using System; using System.Diagnostics; using Utils; public class Program { static void Main(string[] args) { try { // Declare string string original = "<-Kenneth->"; // Get padding width int width = 15; // Display result Display("Original: '" + original + "'"); Display("Pad Center: '" + original.PadCenter(width) + "'"); Display("Pad Right: '" + original.PadRight(width) + "'"); Display("Pad Left: '" + original.PadLeft(width) + "'"); } catch (Exception ex) { Display(ex.ToString()); } finally { Console.ReadLine(); } } static void Display(string message) { Console.WriteLine(message); Debug.Print(message); } }// http://programmingnotes.org/ |
QUICK NOTES:
The highlighted lines are sections of interest to look out for.
The code is heavily commented, so no further insight is necessary. If you have any questions, feel free to leave a comment below.
C# || How To Get The Date Value & Time Value From A Date Using C#
The following is a module with functions which demonstrates how to get the date value and time value from a DateTime using C#.
The functions listed on this page demonstrates how to isolate the date portion of a date, as well as the time portion of a date. For example, given the date “5/23/2019 7:28:31 PM”, the date value would be 5/23/2019, and time value 7:28:31 PM.
1. Date Value
The example below demonstrates the use of ‘Utils.Methods.DateValue‘ to get the date value of a date.
The DateTime object value contains the date information, with the time portion set to midnight (00:00:00)
|
1 2 3 4 5 6 7 8 9 10 11 12 13 14 15 16 17 18 19 |
// Date Value // Declare date value var original = "5/23/2019 7:28:31 PM"; // Get the date portion var dateOnly = Utils.Methods.DateValue(original); // Display results Console.WriteLine($@" Original: {original} Date Value: {dateOnly} "); // example output: /* Original: 5/23/2019 7:28:31 PM Date Value: 5/23/2019 12:00:00 AM */ |
2. Time Value
The example below demonstrates the use of ‘Utils.Methods.TimeValue‘ to get the date value of a date.
The DateTime object contains the time information, with the date portion set to January 1 of the year 1
|
1 2 3 4 5 6 7 8 9 10 11 12 13 14 15 16 17 18 19 |
// Time Value // Declare date value var original = "5/23/2019 7:28:31 PM"; // Get the time portion var timeOnly = Utils.Methods.TimeValue(original); // Display results Console.WriteLine($@" Original: {original} Time Value: {timeOnly} "); // example output: /* Original: 5/23/2019 7:28:31 PM Time Value: 1/1/0001 7:28:31 PM */ |
3. Utils Namespace
The following is the Utils Namespace. Include this in your project to start using!
|
1 2 3 4 5 6 7 8 9 10 11 12 13 14 15 16 17 18 19 20 21 22 23 24 25 26 27 28 29 30 31 32 33 34 35 36 37 38 39 40 41 42 43 44 45 46 47 48 49 50 51 52 53 54 55 56 57 58 59 60 |
// ============================================================================ // Author: Kenneth Perkins // Date: May 23, 2021 // Taken From: http://programmingnotes.org/ // File: Utils.cs // Description: Handles general utility functions // ============================================================================ using System; namespace Utils { public static class Methods { /// <summary> /// Returns a DateTime value containing the date information, with /// the time information set to midnight (00:00:00) /// </summary> /// <param name="value">A string expression representing a date/time /// value from 00:00:00 on January 1 of the year 1 through 23:59:59 /// on December 31, 9999</param> /// <returns>A DateTime value containing the date information, with /// the time information set to midnight (00:00:00)</returns> public static DateTime DateValue(string value) { return DateValue(System.Convert.ToDateTime(value)); } /// <summary> /// Returns a DateTime value containing the date information, with the /// time information set to midnight (00:00:00) /// </summary> /// <param name="value">A DateTime value</param> /// <returns>A DateTime value containing the date information, with the /// time information set to midnight (00:00:00)</returns> public static DateTime DateValue(DateTime value) { return value.Date; } /// <summary> /// Returns a DateTime value containing the time information, with the /// date information set to January 1 of the year 1 /// </summary> /// <param name="value">A string expression representing a date/time /// value from 00:00:00 on January 1 of the year 1 through 23:59:59 /// on December 31, 9999</param> /// <returns>A DateTime value containing the time information, with the /// date information set to January 1 of the year 1</returns> public static DateTime TimeValue(string value) { return TimeValue(System.Convert.ToDateTime(value)); } /// <summary> /// Returns a DateTime value containing the time information, with /// the date information set to January 1 of the year 1 /// </summary> /// <param name="value">A DateTime value</param> /// <returns>A DateTime value containing the time information, with /// the date information set to January 1 of the year 1</returns> public static DateTime TimeValue(DateTime value) { return (new DateTime()).Add(value.TimeOfDay); } } }// http://programmingnotes.org/ |
4. More Examples
Below are more examples demonstrating the use of the ‘Utils‘ Namespace. Don’t forget to include the module when running the examples!
|
1 2 3 4 5 6 7 8 9 10 11 12 13 14 15 16 17 18 19 20 21 22 23 24 25 26 27 28 29 30 31 32 33 34 35 36 37 38 39 40 |
// ============================================================================ // Author: Kenneth Perkins // Date: May 23, 2021 // Taken From: http://programmingnotes.org/ // File: Program.cs // Description: The following demonstrates the use of the Utils Namespace // ============================================================================ using System; using System.Diagnostics; public class Program { static void Main(string[] args) { try { // Declare date value var original = "5/23/2019 7:28:31 PM"; // Get the date portion var dateOnly = Utils.Methods.DateValue(original); // Get the time portion var timeOnly = Utils.Methods.TimeValue(original); // Display results Display($@" Original: {original} Date Value: {dateOnly} Time Value: {timeOnly} "); } catch (Exception ex) { Display(ex.ToString()); } finally { Console.ReadLine(); } } static void Display(string message) { Console.WriteLine(message); Debug.Print(message); } }// http://programmingnotes.org/ |
QUICK NOTES:
The highlighted lines are sections of interest to look out for.
The code is heavily commented, so no further insight is necessary. If you have any questions, feel free to leave a comment below.
C# || How To Create Multiple Tasks With Maximum Concurrency Using C#
The following is a module with functions which demonstrates how to create multiple tasks with maximum concurrency using C#.
The examples demonstrated on this page uses System.Threading.Tasks.Task to start and run tasks. They also use System.Threading.SemaphoreSlim to limit the number of tasks that can run concurrently.
The examples on this page demonstrates how to start and run multiple tasks with a maximum concurrency. It also demonstrates how to start and run multiple tasks with a return value.
1. Task – Maximum Concurrency
The example below demonstrates how to start and run multiple tasks with a maximum concurrency. For example purposes, the tasks do not return a value.
The functions shown in the example below are called asynchronously, but they can also be called synchronously.
|
1 2 3 4 5 6 7 8 9 10 11 12 13 14 15 16 17 18 19 20 21 22 23 24 25 26 27 28 29 30 31 32 33 34 35 36 37 38 39 40 41 42 43 44 45 46 47 48 49 50 51 52 53 54 55 56 57 58 59 60 61 62 63 64 65 66 67 68 69 70 71 72 73 74 75 76 77 78 79 80 81 82 83 84 |
// Task - Maximum Concurrency var concurrentTasks = 5; var semaphore = new System.Threading.SemaphoreSlim(concurrentTasks, concurrentTasks); var tasks = new List<System.Threading.Tasks.Task>(); for (var count = 1; count <= 20; ++count) { var taskNumber = count; // Blocks execution until another task can be started. // This function also accepts a timeout in milliseconds await semaphore.WaitAsync(); // Start a task var task = System.Threading.Tasks.Task.Run(async () => { // Execute long running code try { Console.WriteLine($"Task #{taskNumber} starting..."); await System.Threading.Tasks.Task.Delay(5000); Console.WriteLine($" - Task #{taskNumber} completed!"); } catch { throw; } finally { // Signal that the task is completed // so another task can start semaphore.Release(); } }); tasks.Add(task); } Console.WriteLine($"Waiting for tasks to complete"); // Wait for all tasks to complete await System.Threading.Tasks.Task.WhenAll(tasks.ToArray()); Console.WriteLine($"All tasks completed!"); // example output: /* Task #2 starting... Task #1 starting... Task #3 starting... Task #5 starting... Task #4 starting... - Task #3 completed! - Task #1 completed! Task #6 starting... - Task #4 completed! - Task #2 completed! Task #8 starting... Task #9 starting... - Task #5 completed! Task #7 starting... Task #10 starting... - Task #6 completed! Task #11 starting... - Task #8 completed! Task #12 starting... - Task #9 completed! Task #13 starting... - Task #7 completed! - Task #10 completed! Task #14 starting... Task #15 starting... - Task #11 completed! Task #16 starting... - Task #12 completed! Task #17 starting... - Task #13 completed! Task #18 starting... - Task #14 completed! - Task #15 completed! Task #19 starting... Waiting for tasks to complete Task #20 starting... - Task #16 completed! - Task #17 completed! - Task #18 completed! - Task #20 completed! - Task #19 completed! All tasks completed! */ |
2. Task – Maximum Concurrency – Return Value
The example below demonstrates how to start and run multiple tasks with a maximum concurrency. In this example, a value is returned and retrieved from the tasks
The functions shown in the example below are called asynchronously, but they can also be called synchronously.
|
1 2 3 4 5 6 7 8 9 10 11 12 13 14 15 16 17 18 19 20 21 22 23 24 25 26 27 28 29 30 31 32 33 34 35 36 37 38 39 40 41 42 43 44 45 46 47 48 49 50 51 52 53 54 55 56 57 58 59 60 61 62 63 64 65 66 67 68 69 70 71 72 73 74 75 76 77 78 79 80 81 82 83 84 85 86 87 88 89 90 91 92 93 94 95 96 97 98 99 100 101 102 103 104 105 106 107 108 109 110 111 112 113 114 115 116 117 118 119 120 121 122 123 124 |
// Task - Maximum Concurrency - Return Value public class Part { public string PartName { get; set; } public int PartId { get; set; } } var concurrentTasks = 5; var semaphore = new System.Threading.SemaphoreSlim(concurrentTasks, concurrentTasks); var tasks = new List<System.Threading.Tasks.Task<Part>>(); for (var count = 1; count <= 20; ++count) { var taskNumber = count; // Blocks execution until another task can be started. // This function also accepts a timeout in milliseconds await semaphore.WaitAsync(); // Start a task var task = System.Threading.Tasks.Task.Run(async () => { // Execute long running code try { Console.WriteLine($"Task #{taskNumber} starting..."); await System.Threading.Tasks.Task.Delay(5000); Console.WriteLine($" - Task #{taskNumber} completed!"); // Return result return new Part() { PartId = taskNumber, PartName = $"Part #{taskNumber}" }; } catch { throw; } finally { // Signal that the task is completed // so another task can start semaphore.Release(); } }); tasks.Add(task); } Console.WriteLine($"Waiting for tasks to complete"); // Wait for all tasks to complete await System.Threading.Tasks.Task.WhenAll(tasks.ToArray()); Console.WriteLine($"All tasks completed!"); Console.WriteLine(""); // Get the results foreach (var task in tasks) { var part = task.Result; Console.WriteLine($"Id: {part.PartId}, Name: {part.PartName}"); } // example output: /* Task #1 starting... Task #2 starting... Task #3 starting... Task #4 starting... Task #5 starting... - Task #3 completed! - Task #1 completed! Task #6 starting... - Task #5 completed! - Task #2 completed! Task #8 starting... Task #7 starting... Task #9 starting... - Task #4 completed! Task #10 starting... - Task #6 completed! Task #11 starting... - Task #8 completed! Task #12 starting... - Task #7 completed! Task #13 starting... - Task #10 completed! - Task #9 completed! Task #14 starting... Task #15 starting... - Task #11 completed! Task #16 starting... - Task #12 completed! Task #17 starting... - Task #13 completed! Task #18 starting... - Task #15 completed! - Task #14 completed! Task #19 starting... Waiting for tasks to complete Task #20 starting... - Task #17 completed! - Task #16 completed! - Task #18 completed! - Task #19 completed! - Task #20 completed! All tasks completed! Id: 1, Name: Part #1 Id: 2, Name: Part #2 Id: 3, Name: Part #3 Id: 4, Name: Part #4 Id: 5, Name: Part #5 Id: 6, Name: Part #6 Id: 7, Name: Part #7 Id: 8, Name: Part #8 Id: 9, Name: Part #9 Id: 10, Name: Part #10 Id: 11, Name: Part #11 Id: 12, Name: Part #12 Id: 13, Name: Part #13 Id: 14, Name: Part #14 Id: 15, Name: Part #15 Id: 16, Name: Part #16 Id: 17, Name: Part #17 Id: 18, Name: Part #18 Id: 19, Name: Part #19 Id: 20, Name: Part #20 */ |
3. More Examples
Below is a full example of the process demonstrated on this page!
|
1 2 3 4 5 6 7 8 9 10 11 12 13 14 15 16 17 18 19 20 21 22 23 24 25 26 27 28 29 30 31 32 33 34 35 36 37 38 39 40 41 42 43 44 45 46 47 48 49 50 51 52 53 54 55 56 57 58 59 60 61 62 63 64 65 66 67 68 69 70 71 72 73 74 75 76 77 78 79 80 81 82 83 84 85 86 87 88 89 90 91 92 93 94 95 96 97 98 99 100 101 102 103 104 105 106 107 108 109 110 111 112 113 114 115 116 117 118 119 120 121 122 123 124 125 126 127 128 129 130 |
// ============================================================================ // Author: Kenneth Perkins // Date: May 15, 2021 // Taken From: http://programmingnotes.org/ // File: Program.cs // Description: The following demonstrates creating a task pool // ============================================================================ using System; using System.Diagnostics; using System.Linq; using System.Collections.Generic; using System.Threading.Tasks; public class Program { public class Part { public string PartName { get; set; } public int? PartId { get; set; } } static void Main(string[] args) { try { //TaskVoid().Wait(); TaskFunction().Wait(); } catch (Exception ex) { Display(ex.ToString()); } finally { Console.ReadLine(); } } public static async Task<List<Part>> TaskFunction() { var concurrentTasks = 5; var semaphore = new System.Threading.SemaphoreSlim(concurrentTasks, concurrentTasks); var tasks = new List<System.Threading.Tasks.Task<Part>>(); for (var count = 1; count <= 20; ++count) { var taskNumber = count; // Blocks execution until another task can be started. // This function also accepts a timeout in milliseconds await semaphore.WaitAsync(); // Start a task var task = System.Threading.Tasks.Task.Run(async () => { // Execute long running code try { Display($"Task #{taskNumber} starting..."); await System.Threading.Tasks.Task.Delay(5000); Display($" - Task #{taskNumber} completed!"); // Return result return new Part() { PartId = taskNumber, PartName = $"Part #{taskNumber}" }; } catch { throw; } finally { // Signal that the task is completed // so another task can start semaphore.Release(); } }); tasks.Add(task); } Display($"Waiting for tasks to complete"); // Wait for all tasks to complete await System.Threading.Tasks.Task.WhenAll(tasks.ToArray()); Display($"All tasks completed!"); Display(""); // Get the results foreach (var task in tasks) { var part = task.Result; Display($"Id: {part.PartId}, Name: {part.PartName}"); } return tasks.Select(task => task.Result).ToList(); } public static async Task TaskVoid() { var concurrentTasks = 5; var semaphore = new System.Threading.SemaphoreSlim(concurrentTasks, concurrentTasks); var tasks = new List<System.Threading.Tasks.Task>(); for (var count = 1; count <= 20; ++count) { var taskNumber = count; // Blocks execution until another task can be started. // This function also accepts a timeout in milliseconds await semaphore.WaitAsync(); // Start a task var task = System.Threading.Tasks.Task.Run(async () => { // Execute long running code try { Display($"Task #{taskNumber} starting..."); await System.Threading.Tasks.Task.Delay(5000); Display($" - Task #{taskNumber} completed!"); } catch { throw; } finally { // Signal that the task is completed // so another task can start semaphore.Release(); } }); tasks.Add(task); } Display($"Waiting for tasks to complete"); // Wait for all tasks to complete await System.Threading.Tasks.Task.WhenAll(tasks.ToArray()); Display($"All tasks completed!"); } static void Display(string message) { Console.WriteLine(message); Debug.Print(message); } }// http://programmingnotes.org/ |
QUICK NOTES:
The highlighted lines are sections of interest to look out for.
The code is heavily commented, so no further insight is necessary. If you have any questions, feel free to leave a comment below.


