


Search Results for: linked list
C# || How To Split Linked List In Parts Using C#

The following is a module with functions which demonstrates how to split linked list in parts using C#.
1. Split Linked List In Parts – Problem Statement
Given the head of a singly linked list and an integer k, split the linked list into k consecutive linked list parts.
The length of each part should be as equal as possible: no two parts should have a size differing by more than one. This may lead to some parts being null.
The parts should be in the order of occurrence in the input list, and parts occurring earlier should always have a size greater than or equal to parts occurring later.
Return an array of the k parts.
Example 1:
Input: head = [1,2,3], k = 5

Output: [[1],[2],[3],[],[]]

Explanation:

The first element output[0] has output[0].val = 1, output[0].next = null.

The last element output[4] is null, but its string representation as a ListNode is [].
Example 2:

Input: head = [1,2,3,4,5,6,7,8,9,10], k = 3

Output: [[1,2,3,4],[5,6,7],[8,9,10]]

Explanation:

The input has been split into consecutive parts with size difference at most 1, and earlier parts are a larger size than the later parts.
2. Split Linked List In Parts – Solution
The following is a solution which demonstrates how to split linked list in parts.
|
1 2 3 4 5 6 7 8 9 10 11 12 13 14 15 16 17 18 19 20 21 22 23 24 25 26 27 28 29 30 31 32 33 34 35 36 37 38 39 40 41 42 43 44 45 46 47 48 49 50 51 52 53 54 55 56 57 58 59 60 61 |
// ============================================================================ // Author: Kenneth Perkins // Date: Feb 1, 2025 // Taken From: http://programmingnotes.org/ // File: Solution.cs // Description: Demonstrates how to split linked list in parts // ============================================================================ /** * Definition for singly-linked list. * public class ListNode { * public int val; * public ListNode next; * public ListNode(int val=0, ListNode next=null) { * this.val = val; * this.next = next; * } * } */ public class Solution { public ListNode[] SplitListToParts(ListNode head, int k) { // Save nodes to a list var items = new List<ListNode>(); for (var iter = head; iter != null; iter = iter.next) { items.Add(iter); } // Create result array var result = new ListNode[k]; // Determine the size of each batch var batchLength = (int)(items.Count / k); // Get the remainder var remainder = items.Count % k; var firstNodeIndex = 0; for (int index = 0; index < Math.Min(k, items.Count); ++index) { var currentBatchLength = batchLength; if (index < remainder) { currentBatchLength += 1; } var lastNodeIndex = firstNodeIndex + (currentBatchLength - 1); // Get the head and tail nodes for this batch var batchHead = items[firstNodeIndex]; var batchTail = items[lastNodeIndex]; // Set the tail to null batchTail.next = null; // Save the head to the result array result[index] = batchHead; // Increment the first node index firstNodeIndex = lastNodeIndex + 1; } return result; } }// http://programmingnotes.org/ |
QUICK NOTES:
The highlighted lines are sections of interest to look out for.
The code is heavily commented, so no further insight is necessary. If you have any questions, feel free to leave a comment below.
Once compiled, you should get this as your output for the example cases:
[[1],[2],[3],[],[]]

[[1,2,3,4],[5,6,7],[8,9,10]]
C# || Remove Linked List Elements – How To Remove All Target Linked List Elements Using C#

The following is a module with functions which demonstrates how to remove all target linked list elements using C#.
1. Remove Elements – Problem Statement
Given the head of a linked list and an integer val, remove all the nodes of the linked list that has Node.val == val, and return the new head.
Example 1:
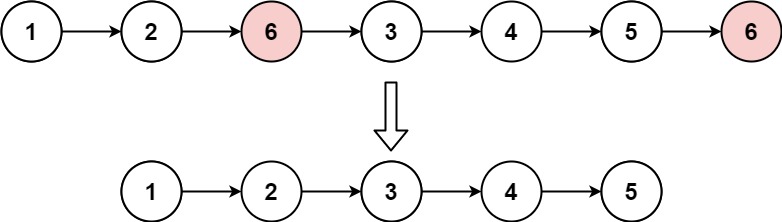
Input: head = [1,2,6,3,4,5,6], val = 6

Output: [1,2,3,4,5]
Example 2:
Input: head = [], val = 1

Output: []
Example 3:
Input: head = [7,7,7,7], val = 7

Output: []
2. Remove Elements – Solution
The following is a solution which demonstrates how to remove all target linked list elements.
|
1 2 3 4 5 6 7 8 9 10 11 12 13 14 15 16 17 18 19 20 21 22 23 24 25 26 27 28 29 30 31 32 33 34 35 36 37 38 39 40 41 42 43 |
// ============================================================================ // Author: Kenneth Perkins // Date: Apr 2, 2022 // Taken From: http://programmingnotes.org/ // File: Solution.cs // Description: Demonstrates how to remove all target linked list elements // ============================================================================ /** * Definition for singly-linked list. * public class ListNode { * public int val; * public ListNode next; * public ListNode(int val=0, ListNode next=null) { * this.val = val; * this.next = next; * } * } */ public class Solution { public ListNode RemoveElements(ListNode head, int val) { var ptr = head; // Loop through data checking to see if the next node equals the target value while (ptr != null && ptr.next != null) { // If the next node value is the target value, set the next node // to point to the one after it if (ptr.next.val == val) { ptr.next = ptr.next.next; } else { // Advance to the next node ptr = ptr.next; } } // If the head equals the target value, advance to the next if (head != null && head.val == val) { head = head.next; } return head; } }// http://programmingnotes.org/ |
QUICK NOTES:
The highlighted lines are sections of interest to look out for.
The code is heavily commented, so no further insight is necessary. If you have any questions, feel free to leave a comment below.
Once compiled, you should get this as your output for the example cases:
[1,2,3,4,5]

[]

[]
C# || How To Flatten A Multilevel Doubly Linked List Using C#
The following is a module with functions which demonstrates how to flatten a doubly linked list using C#.
1. Flatten – Problem Statement
You are given a doubly linked list which in addition to the next and previous pointers, it could have a child pointer, which may or may not point to a separate doubly linked list. These child lists may have one or more children of their own, and so on, to produce a multilevel data structure, as shown in the example below.
Flatten the list so that all the nodes appear in a single-level, doubly linked list. You are given the head of the first level of the list.
Example 1:
Input: head = [1,2,3,4,5,6,null,null,null,7,8,9,10,null,null,11,12]

Output: [1,2,3,7,8,11,12,9,10,4,5,6]

Explanation:
The multilevel linked list in the input is as follows:
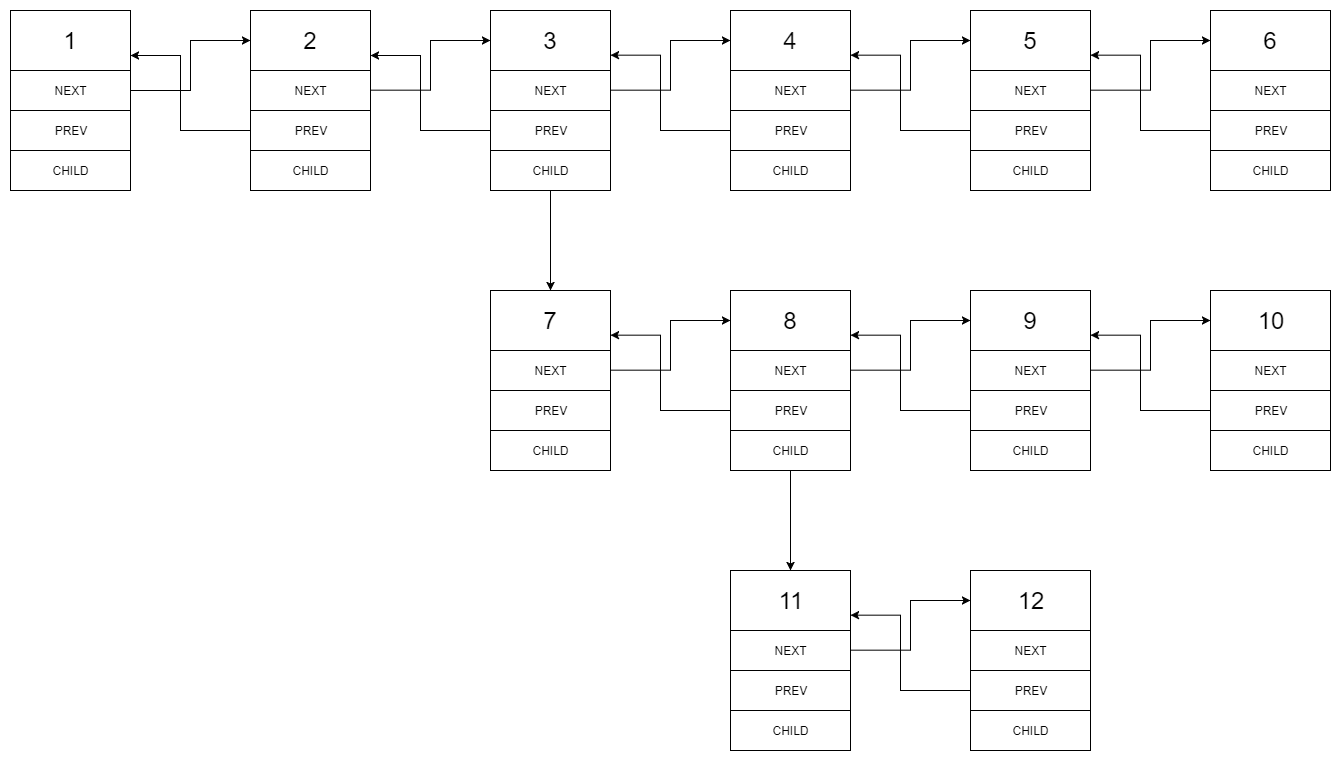
After flattening the multilevel linked list it becomes:

Example 2:
Input: head = [1,2,null,3]

Output: [1,3,2]

Explanation:
The input multilevel linked list is as follows:
1---2---NULL
|
3---NULL
Example 3:
Input: head = []

Output: []
2. Flatten – Solution
The following are two solutions which demonstrates how to flatten a doubly linked list.
Iterative
|
1 2 3 4 5 6 7 8 9 10 11 12 13 14 15 16 17 18 19 20 21 22 23 24 25 26 27 28 29 30 31 32 33 34 35 36 37 38 39 40 41 42 43 44 45 46 47 48 49 50 51 52 53 54 55 56 57 58 59 |
// ============================================================================ // Author: Kenneth Perkins // Date: Oct 30, 2021 // Taken From: http://programmingnotes.org/ // File: Solution.cs // Description: Demonstrates how to flatten a doubly linked list // ============================================================================ /* // Definition for a Node. public class Node { public int val; public Node prev; public Node next; public Node child; } */ public class Solution { public Node Flatten(Node head) { var current = head; var stack = new Stack<Node>(); // Loop through nodes while (current != null) { // Check to see if node has child if (current.child != null) { // If current node has a next node, save to stack // so we can reconnect it to the tail // of the child node later if (current.next != null) { stack.Push(current.next); } // Set the next node as the child, // we will now iterate down this path current.next = current.child; // Set the previous node as the current current.next.prev = current; // Set child to null current.child = null; } else if (current.next == null) { // Reconnect node at the top of the // stack to the tail child node if (stack.Count > 0) { // Set the next node as the reconnected node, // we will now iterate down this path current.next = stack.Pop(); current.next.prev = current; } } current = current.next; } return head; } }// http://programmingnotes.org/ |
Recursive
|
1 2 3 4 5 6 7 8 9 10 11 12 13 14 15 16 17 18 19 20 21 22 23 24 25 26 27 28 29 30 31 32 33 34 35 36 37 38 39 40 41 42 43 44 45 46 47 48 |
// ============================================================================ // Author: Kenneth Perkins // Date: Oct 30, 2021 // Taken From: http://programmingnotes.org/ // File: Solution.cs // Description: Demonstrates how to flatten a doubly linked list // ============================================================================ /* // Definition for a Node. public class Node { public int val; public Node prev; public Node next; public Node child; } */ public class Solution { public Node Flatten(Node head) { Flatten(head, null); return head; } private Node Flatten(Node current, Node previous) { if (current == null) { return previous; } // If previous node exists, set the next and previous values if (previous != null) { previous.next = current; current.prev = previous; } // Save the next node so we can reconnect it to the tail // of the child node later var next = current.next; // Traverse down child path. // If children exist, this returns the last child for the current node var tail = Flatten(current.child, current); // Child path has been explored, set to null current.child = null; // Reconnect the next node to the tail child node return Flatten(next, tail); } }// http://programmingnotes.org/ |
QUICK NOTES:
The highlighted lines are sections of interest to look out for.
The code is heavily commented, so no further insight is necessary. If you have any questions, feel free to leave a comment below.
Once compiled, you should get this as your output for the example cases:
[1,2,3,7,8,11,12,9,10,4,5,6]

[1,3,2]

[]
C++ || Snippet – Simple Linked List Using Delete, Insert, & Display Functions
The following is sample code for a simple linked list, which implements the following functions: “Delete, Insert, and Display.”
The sample code provided on this page is a stripped down version of a more robust linked list class which was previously discussed on this site. Sample code for that can be found here.
It is recommended you check that out as the functions implemented within that class are very useful.
|
1 2 3 4 5 6 7 8 9 10 11 12 13 14 15 16 17 18 19 20 21 22 23 24 25 26 27 28 29 30 31 32 33 34 35 36 37 38 39 40 41 42 43 44 45 46 47 48 49 50 51 52 53 54 55 56 57 58 59 60 61 62 63 64 65 66 67 68 69 70 71 72 73 74 75 76 77 78 79 80 81 82 83 84 85 86 87 88 89 90 91 92 93 94 95 96 97 98 99 100 101 102 103 104 105 106 107 108 109 110 111 112 113 114 115 116 117 118 119 120 121 122 123 124 125 126 127 128 129 130 131 132 133 134 135 136 137 138 139 140 141 142 143 144 145 146 147 148 |
// ============================================================================ // Author: Kenneth Perkins // Date: Aug 18, 2012 // Taken From: http://programmingnotes.org/ // File: SimpleList.cpp // Description: Demonstrates the use of a simple linked list. // ============================================================================ #include <iostream> #include <string> using namespace std; struct node { /* -- you can use different data types here -- instead of just a string char letter; int number; double fNumber; */ string name; node* next; }; // global variables // this is the front of the list node* head = NULL; // function prototype void Insert(string info); void Delete(string info); void Display(); void DestroyList(); int main() { // if you want to insert data into the list // this is one way you can do it, using a 'temp' pointer node* temp = new node; temp->name = "My Programming Notes"; temp->next = NULL; // set the head node to the data thats in the 'temp' pointer head = temp; // display data to the screen cout << head->name <<endl<<endl; // use the insert function to add new data to the list // NOTE: you could have also used the 'insert' function ^ above // to place data into the list Insert("Is An Awesome Site!"); // insert more data into the list Insert("August"); Display(); // delete the selected text from the list Delete("August"); Display(); // destroy the current pointers in the list // after you are finished using them DestroyList(); return 0; }// end of main void Insert(string info) { node* newItem = new node; newItem->name = info; newItem->next = NULL; // if the list is empty, add new item to the front if(head == NULL) { head = newItem; } else // if the list isnt empty, add new item to the end { node* iter = head; while(iter->next != NULL) { iter = iter->next; } iter->next = newItem; } }// end of Insert void Delete(string info) { node* iter = head; // if the list is empty, do nothing if(head == NULL) { return; } // delete the first item in the list else if(head->name == info) { head = head->next; delete iter; } // search the list until we find the desired item else { while(iter->next != NULL) { if(iter->next->name == info) { node* deleteNode = iter->next; iter->next = iter->next->next; delete deleteNode; break; } iter = iter->next; } } }// end of Delete void Display() { node* iter = head; // traverse thru the list, displaying the // text at each node location while(iter != NULL) { cout<<iter->name<<endl; iter = iter->next; } cout<<endl; }// end of Display void DestroyList() { if(head != NULL) { cout << "\n\nDestroying nodes...\n"; while(head != NULL) { node* temp = head; cout << temp->name <<endl; head = head->next; delete temp; } } }// http://programmingnotes.org/ |
QUICK NOTES:
The highlighted lines are sections of interest to look out for.
The code is heavily commented, so no further insight is necessary. If you have any questions, feel free to leave a comment below.
Once compiled, you should get this as your output
My Programming NotesMy Programming Notes
Is An Awesome Site!
August[DELETE THE TEXT "AUGUST"]
My Programming Notes
Is An Awesome Site!Destroying nodes...
My Programming Notes
Is An Awesome Site!
C++ || Snippet – Custom Template Linked List Sample Code
This page will consist of sample code for a singly linked list, which is loosely based on the built in C++ “List” library. Provided in the linked list class are the following functions:
|
1 2 3 4 5 6 7 8 9 10 11 12 13 14 15 16 17 18 19 20 21 22 23 24 25 26 27 28 29 30 |
* PushFront - Adds new item to the front of the list (LIFO) * PushBack - Adds new item to the back of the list (FIFO) * PopFront - Returns & removes first item from the list * PopBack - Returns & removes last item from the list * Front - Returns (but does not delete) the first item from the list * Back - Returns (but does not delete) the last item from the list * Delete - Searches and deletes the requested item * Display - Display all the current contents in the list * Replace - Replaces existing item from the list with a new item If existing item cannot be found, the new item is added to the back of the list * InsertBefore - Inserts new item before the existing item. If existing item cannot be found, the new item is added to the back of the list * InsertAfter - Inserts new item after the existing item. If existing item cannot be found, the new item is added to the back of the list * InsertInOrder - Inserts new item in numerical order, from lowest to highest * Size - Return the current size of the list * MakeEmpty - Initializes the list to an empty state |
From the following, the functions of interest to look out for are the “Delete, Display, Replace, InsertBefore, InsertAfter, and InsertInOrder” functions as they are typically used as programming assignments in many C++ Data structures courses to further demonstrate how linked lists operate.
|
1 2 3 4 5 6 7 8 9 10 11 12 13 14 15 16 17 18 19 20 21 22 23 24 25 26 27 28 29 30 31 32 33 34 35 36 37 38 39 40 41 42 43 44 45 46 47 48 49 50 51 52 53 54 55 56 57 58 59 60 61 62 63 64 65 66 67 68 69 70 71 72 73 74 75 76 77 78 79 80 81 82 83 84 85 86 87 88 89 90 91 92 93 94 95 96 97 98 99 100 101 102 103 104 105 106 107 108 109 110 111 112 113 114 115 116 117 118 119 120 121 122 123 124 125 126 127 128 129 130 131 132 133 134 135 136 137 138 139 140 141 142 143 144 145 146 147 148 149 150 151 152 153 154 155 156 157 158 159 160 161 162 163 164 165 166 167 168 169 170 171 172 173 174 175 176 177 178 179 180 181 182 183 184 185 186 187 188 189 190 191 192 193 194 195 196 197 198 199 200 201 202 203 204 205 206 207 208 209 210 211 212 213 214 215 216 217 218 219 220 221 222 223 224 225 226 227 228 229 230 231 232 233 234 235 236 237 238 239 240 241 242 243 244 245 246 247 248 249 250 251 252 253 254 255 256 257 258 259 260 261 262 263 264 265 266 267 268 269 270 271 272 273 274 275 276 277 278 279 280 281 282 283 284 285 286 287 288 289 290 291 292 293 294 295 296 297 298 299 300 301 302 303 304 305 306 307 308 309 310 311 312 313 314 315 316 317 318 319 320 321 322 323 324 325 326 327 328 329 330 331 332 333 334 335 336 337 338 339 340 341 342 343 344 345 346 347 348 349 350 351 352 353 354 355 356 357 358 359 360 361 362 363 364 365 366 367 368 369 370 371 372 373 374 375 376 377 378 379 380 381 382 383 384 385 386 387 388 389 390 391 392 393 394 395 396 397 398 399 400 401 402 403 404 405 406 407 408 409 410 411 412 413 414 415 416 417 418 419 420 421 422 423 424 425 426 427 428 429 430 431 432 433 434 435 436 437 438 439 440 441 442 443 444 445 446 447 448 449 450 451 452 |
// ============================================================================ // Author: Kenneth Perkins // Date: Jul 26, 2012 // Taken From: http://programmingnotes.org/ // File: LinkedList.h // Description: This is a class which implements various functions which // demonstrates the use of a Linked List. // ============================================================================ #include <iostream> template <class ItemType> class LinkedList { public: LinkedList(); /* Function: Constructor initializes list Precondition: None Postcondition: Defines private variables */ bool IsEmpty(); /* Function: Determines whether queue is empty Precondition: List has been created Postcondition: The function = true if the list is empty and the function = false if list is not empty */ void PushFront(ItemType item); /* Function: Adds new item to the front of the list (LIFO) Precondition: List has been created and is not full Postcondition: Item is in the list */ void PushBack(ItemType item); /* Function: Adds new item to the back of the list (FIFO) Precondition: List has been created and is not full Postcondition: Item is in the list */ ItemType PopFront(); /* Function: Returns & removes first item from the last Precondition: List has been initialized Postcondition: The first item in the list is removed */ ItemType PopBack(); /* Function: Returns & removes last item from the list Precondition: List has been initialized Postcondition: The last item in the list is removed */ ItemType Front(); /* Function: Returns (but does not delete) the first item from the list Precondition: List has been initialized Postcondition: The first item in the list is removed */ ItemType Back(); /* Function: Returns (but does not delete) the last item from the list Precondition: List has been initialized Postcondition: The last item in the list is removed */ void Delete(ItemType item); /* Function: Searches and deletes the requested item Precondition: List has been created and is not empty Postcondition: Item removed from the list */ void Display(); /* Function: Display all the current contents in the list Precondition: List has been created and is not empty Postcondition: List is displayed to the screen */ void Replace(ItemType initial, ItemType replace); /* Function: Replaces existing item from the list with a new item Precondition: List has been created and is not empty Postcondition: Initial item is replaced with the new one */ void InsertBefore(ItemType initial, ItemType newItem); /* Function: Inserts new item before the existing item Precondition: List has been created and is not empty Postcondition: New item is inserted before the existing item */ void InsertAfter(ItemType initial, ItemType newItem); /* Function: Inserts new item after the existing item Precondition: List has been created and is not empty Postcondition: New item is inserted after the existing item */ void InsertInOrder(ItemType item); /* Function: Inserts new item in numerical order, from lowest to highest Precondition: List has been created and is not empty Postcondition: The list is sorted in numerical order */ int Size(); /* Function: Return the current size of the list Precondition: List has been initialized Postcondition: The size of the list is returned */ void MakeEmpty(); /* Function: Initializes the list to an empty state Precondition: List has been created Postcondition: List no longer exists */ ~LinkedList(); /* Function: Deletes all the items in the list Precondition: List has been declared Postcondition: List no longer exists */ private: struct node { ItemType info; node* next; }; node* head; int size; }; //========================= Implementation ================================// template <class ItemType> LinkedList<ItemType>::LinkedList() { head = NULL; size = 0; }// end of LinkedList template <class ItemType> bool LinkedList<ItemType>::IsEmpty() { return (head==NULL); }// end of IsEmpty template <class ItemType> void LinkedList<ItemType>::PushFront(ItemType item) { // LIFO node* temp = new node; temp-> info = item; temp-> next = head; head = temp; ++size; }// end of PushFront template <class ItemType> void LinkedList<ItemType>::PushBack(ItemType item) { // FIFO node* temp = new node; temp->info = item; temp->next = NULL; if(IsEmpty()) { head=temp; } else { node* temp2 = head; while(temp2->next!=NULL) { temp2=temp2->next; } temp2->next=temp; } ++size; }// end of PushBack template <class ItemType> ItemType LinkedList<ItemType>::PopFront() { if(IsEmpty()) { std::cout<<"\nLIST EMPTY\n"; } else { ItemType item = head-> info; node* temp = head; head = head-> next; delete temp; --size; return item; } }// end of PopFront template <class ItemType> ItemType LinkedList<ItemType>::PopBack() { if(IsEmpty()) { std::cout<<"\nLIST EMPTY\n"; } else if(size == 1) { ItemType item = PopFront(); return item; } else { node* temp = head; ItemType item; while(temp->next != NULL) { if(temp->next->next==NULL) { node* temp2=temp->next; temp->next=temp->next->next; item = temp2-> info; delete temp2; break; } temp=temp->next; } --size; return item; } }// end of PopBack template <class ItemType> ItemType LinkedList<ItemType>::Front() { if(IsEmpty()) { std::cout<<"\nLIST EMPTY\n"; } else { return head-> info; } }// end of Front template <class ItemType> ItemType LinkedList<ItemType>::Back() { if(IsEmpty()) { std::cout<<"\nLIST EMPTY\n"; } else { node* temp = head; while(temp->next != NULL) { temp = temp-> next; } ItemType item = temp-> info; return item; } }// end of Back template <class ItemType> void LinkedList<ItemType>::Delete(ItemType item) { node* temp=head; if(IsEmpty()) { return; } else if(temp->info==item) { head=head->next; delete temp; --size; } else { while(temp->next!=NULL) { if(temp->next->info==item) { node* temp2=temp->next; temp->next=temp->next->next; delete temp2; --size; break; } temp=temp->next; } } }// end of Delete template <class ItemType> void LinkedList<ItemType>::Display() { node* temp=head; while(temp!=NULL) { std::cout<<temp->info<<std::endl; temp=temp->next; } }// end of Display template <class ItemType> void LinkedList<ItemType>::Replace(ItemType initial, ItemType replace) { node* temp=head; if(IsEmpty()) { PushFront(replace); } else if(temp->info==initial) { temp->info=replace; } else { while(temp->next!=NULL) { if(temp->info==initial) { temp->info=replace; break; } temp=temp->next; } if(temp->next==NULL) { PushBack(replace); } } }// end of Replace template <class ItemType> void LinkedList<ItemType>::InsertBefore(ItemType initial, ItemType newItem) { node* temp=head; node* temp2=new node; temp2->info=initial; temp2->next=NULL; if(IsEmpty()) { PushFront(newItem); } else if(temp->info==initial) { temp->info=newItem; temp2->next=temp->next; temp->next=temp2; ++size; } else { while(temp->next!=NULL) { if(temp->info==initial) { temp->info=newItem; temp2->next=temp->next; temp->next=temp2; ++size; break; } temp=temp->next; } if(temp->next==NULL) { PushBack(newItem); } } }// end of InsertBefore template <class ItemType> void LinkedList<ItemType>::InsertAfter(ItemType initial, ItemType newItem) { node* temp=head; node* temp2=new node; temp2->info=newItem; temp2->next=NULL; if(IsEmpty()) { PushFront(newItem); } else if(temp->info==initial) { temp2->next=temp->next; temp->next=temp2; ++size; } else { while(temp->next!=NULL) { if(temp->info==initial) { temp2->next=temp->next; temp->next=temp2; ++size; break; } temp=temp->next; } if(temp->next==NULL) { PushBack(newItem); } } }// end of InsertAfter template <class ItemType> void LinkedList<ItemType>::InsertInOrder(ItemType item) { if(IsEmpty()) { PushFront(item); } else { node* temp=head; node* temp2=new node; if(item <=(temp->info)) { ItemType placeHolder=temp->info; temp2->info=placeHolder; temp->info=item; temp2->next=temp->next; temp->next=temp2; ++size; } else { while(temp->next!=NULL) { if(((temp->info) <= item) && (item <= (temp->next->info))) { temp2->info=item; temp2->next=temp->next; temp->next=temp2; ++size; return; } temp=temp->next; } if(temp->next==NULL) { PushBack(item); } } } }// end of InsertInOrder template <class ItemType> int LinkedList<ItemType>::Size() { if(IsEmpty()) { std::cout<<"\nLIST EMPTY\n"; } return size; }// end of Size template <class ItemType> void LinkedList<ItemType>::MakeEmpty() { if(!IsEmpty()) { std::cout << "\nDestroying nodes...\n"; while(!IsEmpty()) { node* temp = head; //std::cout << temp-> info << '\n'; head = head-> next; delete temp; } size = 0; } }// end of MakeEmpty template <class ItemType> LinkedList<ItemType>::~LinkedList() { MakeEmpty(); }// http://programmingnotes.org/ |
===== DEMONSTRATION HOW TO USE =====
Use of the above template class is the same as its STL counterpart. Here is a sample program demonstrating its use.
|
1 2 3 4 5 6 7 8 9 10 11 12 13 14 15 16 17 18 19 20 21 22 23 24 25 26 27 28 29 30 31 32 33 34 35 36 37 38 39 40 41 42 43 44 45 46 47 48 49 50 51 52 53 54 55 56 57 58 59 |
#include <iostream> #include <string> #include "LinkedList.h" using namespace std; int main() { // declare variables, using a string as // the item type for the class. // NOTE: you can also use an int, float, double etc. // instead of a string LinkedList<string> list; // demontrate the "InOrder" function cout<<"** These are names of fruits sorted in order" <<" using the 'InsertInOrder()' function:\n\n"; list.InsertInOrder("Tomato"); list.InsertInOrder("Orange"); list.InsertInOrder("Apple"); list.InsertInOrder("Plum"); list.Display(); cout<<"\nThere is currently "<<list.Size()<<" items in the list\n\n"; // demonstrate the "Delete" function cout<<"\n** Here is the same list with the word 'Plum' deleted" << "\nusing the 'Delete()' function:\n\n"; list.Delete("Plum"); list.Display(); cout<<"\nThere is currently "<<list.Size()<<" items in the listnn"; // demonstrate the "InsertAfter" function cout<<"\n** Now the word 'Bike' will be added to the list," <<"\nright after the word 'Apple' using the " <<"'InsertAfter()' function:\n\n"; list.InsertAfter("Apple","Bike"); list.Display(); cout<<"\nThere is currently "<<list.Size()<<" items in the list\n\n"; // demonstrate the "InsertBefore" function cout<<"\n** Now the name 'Jessica' will be added to the list," <<"\nright before the word 'Orange' using the " <<"'InsertBefore()' function:\n\n"; list.InsertBefore("Orange","Jessica"); list.Display(); cout<<"\nThere is currently "<<list.Size()<<" items in the list\n\n"; // demonstrate the "Replace" function cout<<"\n** The word 'Orange' will now be replaced with the name," <<"\n'Kat' using the 'Replace()' function:\n\n"; list.Replace("Orange","Kat"); list.Display(); cout<<"\nThere is currently "<<list.Size()<<" items in the list\n\n"; }// http://programmingnotes.org/ |
Once compiled, you should get this as your output
** These are names of fruits sorted in order using the 'InsertInOrder()' function:Apple
Orange
Plum
TomatoThere is currently 4 items in the list
** Here is the same list with the word 'Plum' deleted
using the 'Delete()' function:Apple
Orange
TomatoThere is currently 3 items in the list
** Now the word 'Bike' will be added to the list,
right after the word 'Apple' using the 'InsertAfter()' function:Apple
Bike
Orange
TomatoThere is currently 4 items in the list
** Now the name 'Jessica' will be added to the list,
right before the word 'Orange' using the 'InsertBefore()' function:Apple
Bike
Jessica
Orange
TomatoThere is currently 5 items in the list
** The word 'Orange' will now be replaced with the name,
'Kat' using the 'Replace()' function:Apple
Bike
Jessica
Kat
TomatoThere is currently 5 items in the list
C++ || Snippet – Singly Linked List Custom Template Queue Sample Code
This page will consist of sample code for a custom singly linked list template queue. This implementation differs from the previously highlighted doubly linked list in that this version uses a single node to store its data rather than using two separate nodes (front and rear).
Looking for sample code for a stack? Click here.
REQUIRED KNOWLEDGE FOR THIS SNIPPET
Structs

Classes

Template Classes - What Are They?''

Queue - What is it?

FIFO - First In First Out

#include < queue>

Linked Lists - How To Use
This template class is a custom duplication of the Standard Template Library (STL) queue class. Whether you like building your own data structures, you simply do not like to use any inbuilt functions, opting to build everything yourself, or your homework requires you make your own data structure, this sample code is really useful. I feel its beneficial building functions such as this, that way you better understand the behind the scene processes.
|
1 2 3 4 5 6 7 8 9 10 11 12 13 14 15 16 17 18 19 20 21 22 23 24 25 26 27 28 29 30 31 32 33 34 35 36 37 38 39 40 41 42 43 44 45 46 47 48 49 50 51 52 53 54 55 56 57 58 59 60 61 62 63 64 65 66 67 68 69 70 71 72 73 74 75 76 77 78 79 80 81 82 83 84 85 86 87 88 89 90 91 92 93 94 95 96 97 98 99 100 101 102 103 104 105 106 107 108 109 110 111 112 113 114 115 116 117 118 119 120 121 122 123 124 125 126 127 128 129 130 131 132 133 134 135 136 137 138 139 140 141 142 143 144 145 146 147 148 149 150 151 152 153 154 155 156 157 158 159 160 161 162 163 164 165 166 167 168 169 170 171 172 173 174 175 176 177 178 179 180 181 182 183 184 185 186 187 188 189 190 191 192 193 194 195 196 197 198 199 200 201 202 203 204 205 206 207 208 209 210 211 212 213 214 |
// ============================================================================ // Author: K Perkins // Date: Jul 14, 2012 // Taken From: http://programmingnotes.org/ // File: SingleQueue.h // Description: This is a class which implements various functions // demonstrating the use of a queue. // ============================================================================ #include <iostream> template <class ItemType> class SingleQueue { public: SingleQueue(); /* Function: Constructor initializes queue Precondition: None Postcondition: Defines private variables */ bool IsEmpty(); /* Function: Determines whether queue is empty Precondition: Queue has been created Postcondition: The function = true if the queue is empty and the function = false if queue is not empty */ bool IsFull(); /* Function: Determines whether queue is full Precondition: Queue has been created Postcondition: The function = true if the queue is full and the function = false if queue is not full */ void EnQueue(ItemType item); /* Function: Adds new item to the back of the queue Precondition: Queue has been created and is not full Postcondition: Item is in the queue */ ItemType DeQueue(); /* Function: Returns and then deletes the first item in the queue Precondition: Queue has been created and is not empty Postcondition: The first item in the queue has been removed and the queue order is maintained */ ItemType Front(); /* Function: Returns (but does not delete) the first item in the queue Precondition: Queue has been created and is not empty Postcondition: The first item in the queue has been returned and the queue order is maintained */ ItemType Rear(); /* Function: Returns (but does not delete) the last item in the queue Precondition: Queue has been created and is not empty Postcondition: The last item in the queue has been returned and the queue order is maintained */ int Size(); /* Function: Return the current size of the queue Precondition: Queue has been initialized Postcondition: The size of the queue is returned */ void MakeEmpty(); /* Function: Initializes queue to an empty state Precondition: Queue has been created Postcondition: Queue no longer exists */ ~SingleQueue(); /* Function: Removes the queue Precondition: Queue has been declared Postcondition: Queue no longer exists */ private: struct NodeType { ItemType currentItem; NodeType* next; }; NodeType* head; // front of queue int size; }; //========================= Implementation ================================// template<class ItemType> SingleQueue<ItemType>::SingleQueue() { head = NULL; size = 0; }/* end of SingleQueue */ template<class ItemType> bool SingleQueue<ItemType>::IsEmpty() { return (head == NULL); }/* end of IsEmpty */ template<class ItemType> bool SingleQueue<ItemType>::IsFull() { try { NodeType* location = new NodeType; delete location; return false; } catch(std::bad_alloc&) { return true; } }/* end of IsFull */ template<class ItemType> void SingleQueue<ItemType>::EnQueue(ItemType newItem) { if(IsFull()) { std::cout<<"nQUEUE FULLn"; } else { NodeType* newNode = new NodeType; // adds new node newNode-> currentItem = newItem; newNode-> next = NULL; if(IsEmpty()) { head = newNode; } else { NodeType* tempPtr = head; while(tempPtr-> next != NULL) { tempPtr = tempPtr-> next; } tempPtr-> next = newNode; } ++size; } }/* end of EnQueue */ template<class ItemType> ItemType SingleQueue<ItemType>::DeQueue() { if(IsEmpty()) { std::cout<<"nQUEUE EMPTYn"; } else { NodeType* tempPtr = head; // temporary pointer ItemType item = head-> currentItem; head = head-> next; delete tempPtr; --size; return item; } }/* end of DeQueue */ template<class ItemType> ItemType SingleQueue<ItemType>::Front() { if(IsEmpty()) { std::cout<<"nQUEUE EMPTYn"; } else { ItemType item = head-> currentItem; return item; } }/* end of Front */ template<class ItemType> ItemType SingleQueue<ItemType>::Rear() { if(IsEmpty()) { std::cout<<"nQUEUE EMPTYn"; } else { NodeType* tempPtr = head; // temporary pointer while(tempPtr->next != NULL) { tempPtr = tempPtr-> next; } ItemType item = tempPtr-> currentItem; return item; } }/* end of Rear */ template<class ItemType> int SingleQueue<ItemType>::Size() { if(IsEmpty()) { std::cout<<"nQUEUE EMPTYn"; } return size; }/* end of Size */ template<class ItemType> void SingleQueue<ItemType>::MakeEmpty() { if(!IsEmpty()) { std::cout << "Destroying nodes ...n"; while(!IsEmpty()) { NodeType* tempPtr = head; //std::cout << tempPtr-> currentItem << 'n'; head = head-> next; delete tempPtr; } size = 0; } }/* end of MakeEmpty */ template<class ItemType> SingleQueue<ItemType>::~SingleQueue() { MakeEmpty(); }// http://programmingnotes.org/ |
QUICK NOTES:
The highlighted lines are sections of interest to look out for.
The code is heavily commented, so no further insight is necessary. If you have any questions, feel free to leave a comment below.
===== DEMONSTRATION HOW TO USE =====
Use of the above template class is the same as its STL counterpart. Here is a sample program demonstrating its use.
|
1 2 3 4 5 6 7 8 9 10 11 12 13 14 15 16 17 18 19 20 21 22 23 24 25 26 27 28 29 30 31 32 33 34 35 36 37 38 39 40 41 42 43 44 45 46 47 48 49 50 51 52 53 54 55 56 57 58 59 60 61 62 63 |
#include <iostream> #include "SingleQueue.h" using namespace std; int main() { // declare variables SingleQueue<char> charQueue; SingleQueue<int> intQueue; SingleQueue<double> doubleQueue; // ------ Char Example ------// char charArry[]="My Programming Notes Is A Big Help!"; int counter=0; while(charArry[counter]!='\0') { charQueue.EnQueue(charArry[counter]); ++counter; } cout<<"charQueue has "<<charQueue.Size()<<" items in it " <<"and contains the text:n"; while(!charQueue.IsEmpty()) { cout<<charQueue.DeQueue(); } cout<<endl; // ------ Int Example ------// int intArry[]={1,22,309,461,-92,66,7,8,1987,9,27,12}; counter=0; while(counter < sizeof(intArry)/sizeof(intArry[0])) { intQueue.EnQueue(intArry[counter]); ++counter; } cout<<"nintQueue has "<<intQueue.Size()<<" items in it.n" <<"The sum of the numbers in the queue is: "; counter=0; while(!intQueue.IsEmpty()) { counter-=intQueue.DeQueue(); } cout<<counter<<endl; // ------ Double Example ------// double doubleArry[]={31.62,2.8,43.9,4.4,19.87,6.23,7.787,68.99,9.6,3.540,12.04}; double sum=0; counter=0; while(counter < sizeof(doubleArry)/sizeof(doubleArry[0])) { doubleQueue.EnQueue(doubleArry[counter]); ++counter; } cout<<"ndoubleQueue has "<<doubleQueue.Size()<<" items in it.n" <<"The sum of the numbers in the queue is: "; while(!doubleQueue.IsEmpty()) { sum+=doubleQueue.DeQueue(); } cout<<sum<<endl; return 0; }// http://programmingnotes.org/ |
Once compiled, you should get this as your output
charQueue has 35 items in it and contains the text:

My Programming Notes Is A Big Help!
intQueue has 12 items in it.
The sum of the numbers in the queue is: -2817doubleQueue has 11 items in it.
The sum of the numbers in the queue is: 210.777
Press any key to continue . . .
C++ || Snippet – Doubly Linked List Custom Template Queue Sample Code

This page will consist of sample code for a custom doubly linked list template queue. This implementation is considered a doubly linked list because it uses two nodes to store data in the queue – a ‘front’ and a ‘rear’ node. This is not a circular linked list, nor does it link forwards and/or backwards.
Looking for sample code for a stack? Click here.
REQUIRED KNOWLEDGE FOR THIS SNIPPET
Structs

Classes

Template Classes - What Are They?

Queue - What is it?

FIFO - First In First Out

#include < queue>

Linked Lists - How To Use
This template class is a custom duplication of the Standard Template Library (STL) queue class. Whether you like building your own data structures, you simply do not like to use any inbuilt functions, opting to build everything yourself, or your homework requires you make your own data structure, this sample code is really useful. I feel its beneficial building functions such as this, that way you better understand the behind the scene processes.
|
1 2 3 4 5 6 7 8 9 10 11 12 13 14 15 16 17 18 19 20 21 22 23 24 25 26 27 28 29 30 31 32 33 34 35 36 37 38 39 40 41 42 43 44 45 46 47 48 49 50 51 52 53 54 55 56 57 58 59 60 61 62 63 64 65 66 67 68 69 70 71 72 73 74 75 76 77 78 79 80 81 82 83 84 85 86 87 88 89 90 91 92 93 94 95 96 97 98 99 100 101 102 103 104 105 106 107 108 109 110 111 112 113 114 115 116 117 118 119 120 121 122 123 124 125 126 127 128 129 130 131 132 133 134 135 136 137 138 139 140 141 142 143 144 145 146 147 148 149 150 151 152 153 154 155 156 157 158 159 160 161 162 163 164 165 166 167 168 169 170 171 172 173 174 175 176 177 178 179 180 181 182 183 184 185 186 187 188 189 190 191 192 193 194 195 196 197 198 199 200 201 202 203 204 205 206 207 208 209 210 |
// ============================================================================ // Author: K Perkins // Date: May 20, 2012 // Taken From: http://programmingnotes.org/ // File: DoubleQueue.h // Description: This is a class which implements various functions // demonstrating the use of a queue. // ============================================================================ #include <iostream> template <class ItemType> class DoubleQueue { public: DoubleQueue(); /* Function: Constructor initializes queue Precondition: None Postcondition: Defines private variables */ bool IsEmpty(); /* Function: Determines whether queue is empty Precondition: Queue has been created Postcondition: The function = true if the queue is empty and the function = false if queue is not empty */ bool IsFull(); /* Function: Determines whether queue is full Precondition: Queue has been created Postcondition: The function = true if the queue is full and the function = false if queue is not full */ void EnQueue(ItemType item); /* Function: Adds new item to the back of the queue Precondition: Queue has been created and is not full Postcondition: Item is in the queue */ ItemType DeQueue(); /* Function: Returns and then deletes the first item in the queue Precondition: Queue has been created and is not empty Postcondition: The first item in the queue has been removed and the queue order is maintained */ ItemType Front(); /* Function: Returns (but does not delete) the first item in the queue Precondition: Queue has been created and is not empty Postcondition: The first item in the queue has been returned and the queue order is maintained */ ItemType Rear(); /* Function: Returns (but does not delete) the last item in the queue Precondition: Queue has been created and is not empty Postcondition: The last item in the queue has been returned and the queue order is maintained */ int Size(); /* Function: Return the current size of the queue Precondition: Queue has been initialized Postcondition: The size of the queue is returned */ void MakeEmpty(); /* Function: Initializes queue to an empty state Precondition: Queue has been created Postcondition: Queue no longer exists */ ~DoubleQueue(); /* Function: Removes the queue Precondition: Queue has been declared Postcondition: Queue no longer exists */ private: struct NodeType { ItemType currentItem; NodeType* next; }; NodeType* front; // front of queue NodeType* rear; // back of queue int size; }; //========================= Implementation ================================// template<class ItemType> DoubleQueue<ItemType>::DoubleQueue() { front = NULL; rear = NULL; size = 0; }/* end of DoubleQueue */ template<class ItemType> bool DoubleQueue<ItemType>::IsEmpty() { return (front == NULL); }/* end of IsEmpty */ template<class ItemType> bool DoubleQueue<ItemType>::IsFull() { try { NodeType* location = new NodeType; delete location; return false; } catch(std::bad_alloc&) { return true; } }/* end of IsFull */ template<class ItemType> void DoubleQueue<ItemType>::EnQueue(ItemType newItem) { if(IsFull()) { std::cout<<"nQUEUE FULLn"; } else { NodeType* newNode = new NodeType; // adds new node newNode-> currentItem = newItem; newNode-> next = NULL; if(rear == NULL) { front = newNode; } else { rear-> next = newNode; } rear = newNode; ++size; } }/* end of EnQueue */ template<class ItemType> ItemType DoubleQueue<ItemType>::DeQueue() { if(IsEmpty()) { std::cout<<"nQUEUE EMPTYn"; } else { NodeType* tempPtr = front; // temporary pointer ItemType item = front-> currentItem; front = front-> next; if(front == NULL) { rear = NULL; } delete tempPtr; --size; return item; } }/* end of DeQueue */ template<class ItemType> ItemType DoubleQueue<ItemType>::Front() { if(IsEmpty()) { std::cout<<"nQUEUE EMPTYn"; } else { return front-> currentItem; } }/* end of Front */ template<class ItemType> ItemType DoubleQueue<ItemType>::Rear() { if(IsEmpty()) { std::cout<<"nQUEUE EMPTYn"; } else { return rear-> currentItem; } }/* end of Rear */ template<class ItemType> int DoubleQueue<ItemType>::Size() { if(IsEmpty()) { std::cout<<"nQUEUE EMPTYn"; } return size; }/* end of Size */ template<class ItemType> void DoubleQueue<ItemType>::MakeEmpty() { if(!IsEmpty()) { std::cout << "Destroying nodes ...n"; while(!IsEmpty()) { NodeType* tempPtr = front; //std::cout << tempPtr-> currentItem << 'n'; front = front-> next; delete tempPtr; } rear = NULL; size = 0; } }/* end of MakeEmpty */ template<class ItemType> DoubleQueue<ItemType>::~DoubleQueue() { MakeEmpty(); }// http://programmingnotes.org/ |
QUICK NOTES:
The highlighted lines are sections of interest to look out for.
The code is heavily commented, so no further insight is necessary. If you have any questions, feel free to leave a comment below.
===== DEMONSTRATION HOW TO USE =====
Use of the above template class is the same as its STL counterpart. Here is a sample program demonstrating its use.
|
1 2 3 4 5 6 7 8 9 10 11 12 13 14 15 16 17 18 19 20 21 22 23 24 25 26 27 28 29 30 31 32 33 34 35 36 37 38 39 40 41 42 43 44 45 46 47 48 49 50 51 52 53 54 55 56 57 58 59 60 61 62 63 |
#include <iostream> #include "DoubleQueue.h" using namespace std; int main() { // declare variables DoubleQueue<char> charQueue; DoubleQueue<int> intQueue; DoubleQueue<float> floatQueue; // ------ Char Example ------// char charArry[]="My Programming Notes Helped Me Succeed!"; int counter=0; while(charArry[counter]!='\0') { charQueue.EnQueue(charArry[counter]); ++counter; } cout<<"charQueue has "<<charQueue.Size()<<" items in it " <<"and contains the text:n"; while(!charQueue.IsEmpty()) { cout<<charQueue.DeQueue(); } cout<<endl; // ------ Int Example ------// int intArry[]={1,22,3,46,5,66,7,8,1987}; counter=0; while(counter<9) { intQueue.EnQueue(intArry[counter]); ++counter; } cout<<"nintQueue has "<<intQueue.Size()<<" items in it.n" <<"The sum of the numbers in the queue is: "; counter=0; while(!intQueue.IsEmpty()) { counter-=intQueue.DeQueue(); } cout<<counter<<endl; // ------ Float Example ------// float floatArry[]={41.6,2.8,43.9,4.4,19.87,6.23,7.787,68.99,9.6,81.540}; float sum=0; counter=0; while(counter<10) { floatQueue.EnQueue(floatArry[counter]); ++counter; } cout<<"nfloatQueue has "<<floatQueue.Size()<<" items in it.n" <<"The sum of the numbers in the queue is: "; while(!floatQueue.IsEmpty()) { sum-=floatQueue.DeQueue(); } cout<<sum<<endl; return 0; }// http://programmingnotes.org/ |
Once compiled, you should get this as your output
charQueue has 39 items in it and contains the text:

My Programming Notes Helped Me Succeed!
intQueue has 9 items in it.
The sum of the numbers in the queue is: -2145floatQueue has 10 items in it.
The sum of the numbers in the queue is: -286.717
C++ || Snippet – Linked List Custom Template Stack Sample Code
This page will consist of sample code for a custom linked list template stack. This page differs from the previously highlighted array based template stack in that this version uses a singly linked list to store data rather than using an array.
Looking for sample code for a queue? Click here.
REQUIRED KNOWLEDGE FOR THIS SNIPPET
Structs

Classes

Template Classes - What Are They?

Stacks

LIFO - What Is It?

#include < stack>

Linked Lists - How To Use
This template class is a custom duplication of the Standard Template Library (STL) stack class. Whether you like building your own data structures, you simply do not like to use any inbuilt functions, opting to build everything yourself, or your homework requires you make your own data structure, this sample code is really useful. I feel its beneficial building functions such as this, that way you better understand the behind the scene processes.
|
1 2 3 4 5 6 7 8 9 10 11 12 13 14 15 16 17 18 19 20 21 22 23 24 25 26 27 28 29 30 31 32 33 34 35 36 37 38 39 40 41 42 43 44 45 46 47 48 49 50 51 52 53 54 55 56 57 58 59 60 61 62 63 64 65 66 67 68 69 70 71 72 73 74 75 76 77 78 79 80 81 82 83 84 85 86 87 88 89 90 91 92 93 94 95 96 97 98 99 100 101 102 103 104 105 106 107 108 109 110 111 112 113 114 115 116 117 118 119 120 121 122 123 124 125 126 127 128 129 130 131 132 133 134 135 136 137 138 139 140 141 142 143 144 145 146 147 148 149 150 151 152 153 154 155 156 157 158 159 160 161 162 163 164 165 166 167 168 169 170 171 172 173 174 175 176 177 178 |
// ============================================================================ // Author: K Perkins // Date: Apr 9, 2012 // Taken From: http://programmingnotes.org/ // File: ClassStackListType.h // Description: This is a class which implements various functions // demonstrating the use of a stack. // ============================================================================ #include <iostream> template <class ItemType> class StackListType { public: StackListType(); /* Function: constructor initializes class variables Precondition: none Postcondition: defines private variables */ bool IsEmpty(); /* Function: Determines whether the stack is empty Precondition: Stack has been initialized Postcondition: Function value = (stack is empty) */ bool IsFull(); /* Function: Determines whether the stack is full Precondition: Stack has been initialized Postcondition: Function value = (stack is full) */ int Size(); /* Function: Return the current size of the stack Precondition: Stack has been initialized Postcondition: If (stack is full) exception FullStack is thrown else newItem is at the top of the stack */ void MakeEmpty(); /* Function: Empties the stack Precondition: Stack has been initialized Postcondition: Stack is empty */ void Push(ItemType newItem); /* Function: Adds newItem to the top of the stack Precondition: Stack has been initialized Postcondition: If (stack is full) exception FullStack is thrown else newItem is at the top of the stack */ ItemType Pop(); /* Function: Returns & then removes top item from the stack Precondition: Stack has been initialized Postcondition: If (stack is empty) exception EmptyStack is thrown else top element has been removed from the stack */ ItemType Top(); /* Function: Returns the top item from the stack Precondition: Stack has been initialized Postcondition: If (stack is empty) exception EmptyStack is thrown else top element has been removed from the stack */ ~StackListType(); /* Function: destructor deallocates class variables Precondition: none Postcondition: deallocates private variables */ private: struct NodeType { ItemType currentItem; // Variable which hold all the incoming currentItem NodeType* next; // Creates a pointer that points to the next node in the list. }; int size; // Indicates the size of the stack ItemType junk; NodeType* headPtr; // Creates a head pointer that will point to the begining of the list. }; //========================= Implementation ================================// template<class ItemType> StackListType<ItemType>::StackListType() { size = 0; headPtr = NULL; }// End of StackListType template<class ItemType> bool StackListType<ItemType>::IsEmpty() { return (headPtr == NULL); }// End of IsEmpty template<class ItemType> bool StackListType<ItemType>::IsFull() { try { NodeType* tempPtr = new NodeType; delete tempPtr; return false; } catch(std::bad_alloc&) { return true; } }// End of IsFull template<class ItemType> int StackListType<ItemType>::Size() { if(IsEmpty()) { std::cout<<"nSTACK EMPTYn"; } return size; }// End of Size template<class ItemType> void StackListType<ItemType>::MakeEmpty() { size = 0; if (!IsEmpty()) { std::cout << "Destroying nodes ...n"; while (!IsEmpty()) { NodeType* tempPtr = headPtr; //std::cout << tempPtr-> currentItem << 'n'; headPtr = headPtr-> next; delete tempPtr; } } }// End of MakeEmpty template<class ItemType> void StackListType<ItemType>::Push(ItemType newItem) { if(IsFull()) { std::cout<<"nSTACK FULLn"; return; } NodeType* tempPtr = new NodeType; tempPtr-> currentItem = newItem; tempPtr-> next = headPtr; headPtr = tempPtr; ++size; }// End of Push template<class ItemType> ItemType StackListType<ItemType>::Pop() { if(IsEmpty()) { std::cout<<"nSTACK EMPTYn"; return junk; } else { ItemType data = headPtr-> currentItem; NodeType* tempPtr = headPtr; headPtr = headPtr-> next; delete tempPtr; --size; return data; } }// End of Pop template<class ItemType> ItemType StackListType<ItemType>::Top() { if(IsEmpty()) { std::cout<<"nSTACK EMPTYn"; return junk; } else { return headPtr-> currentItem; } }// End of Top template<class ItemType> StackListType<ItemType>::~StackListType() { MakeEmpty(); }// http://programmingnotes.org/ |
QUICK NOTES:
The highlighted lines are sections of interest to look out for.
The code is heavily commented, so no further insight is necessary. If you have any questions, feel free to leave a comment below.
===== DEMONSTRATION HOW TO USE =====
Use of the above template class is the same as its STL counterpart. Here is a sample program demonstrating its use.
|
1 2 3 4 5 6 7 8 9 10 11 12 13 14 15 16 17 18 19 20 21 22 23 24 25 26 27 28 29 30 31 32 33 34 35 36 37 38 39 40 41 42 43 44 45 46 47 48 49 50 51 52 53 54 55 56 57 58 59 60 |
#include <iostream> #include "ClassStackListType.h" using namespace std; int main() { // declare variables StackListType<char> charStack; StackListType<int> intStack; StackListType<float> floatStack; // ------ Char Example ------// char charArry[]="My Programming Notes Is Awesome"; int counter=0; while(charArry[counter]!='\0') { charStack.Push(charArry[counter]); ++counter; } cout<<"charStack has "<<charStack.Size()<<" items in itn" <<"and contains the text ""<<charArry<<"" backwards:n"; while(!charStack.IsEmpty()) { cout<<charStack.Pop(); } cout<<endl; // ------ Int Example ------// int intArry[]={1,22,3,46,5,66,7,8,1987}; counter=0; while(counter<9) { intStack.Push(intArry[counter]); ++counter; } cout<<"nintStack has "<<intStack.Size()<<" items in it.n" <<"The sum of the numbers in the stack is: "; counter=0; while(!intStack.IsEmpty()) { counter+=intStack.Pop(); } cout<<counter<<endl; // ------ Float Example ------// float floatArry[]={41.6,2.8,43.9,4.4,19.87,6.23,7.787,68.99,9.6,81.540}; float sum=0; counter=0; while(counter<10) { floatStack.Push(floatArry[counter]); ++counter; } cout<<"nfloatStack has "<<floatStack.Size()<<" items in it.n" <<"The sum of the numbers in the stack is: "; while(!floatStack.IsEmpty()) { sum+=floatStack.Pop(); } cout<<sum<<endl; }// http://programmingnotes.org/ |
Once compiled, you should get this as your output
charStack has 31 items in it

and contains the text "My Programming Notes Is Awesome" backwards:

emosewA sI setoN gnimmargorP yM
intStack has 9 items in it.
The sum of the numbers in the stack is: 2145floatStack has 10 items in it.
The sum of the numbers in the stack is: 286.717
C++ || Custom Template Hash Map With Iterator Using Separate Chaining
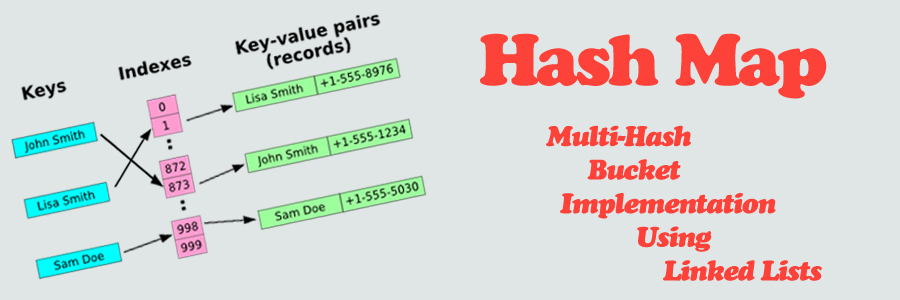
Before we get into the code, what is a Hash Map? Simply put, a Hash Map is an extension of a Hash Table; which is a data structure used to map unique “keys” to specific “values.” The Hash Map demonstrated on this page is different from the previous Hash Table implementation in that key/value pairs do not need to be the same datatype, they can be completely different. So for example, if you wish to map a string “key” to an integer “value“, utilizing a Hash Map is ideal.
In its most simplest form, a Hash Map can be thought of as an associative array, or a “dictionary.” Hash Map’s are composed of a collection of key/value pairs, such that each possible key appears atleast once in the collection for a given value. While a standard array requires that indice subscripts be integers, a hash map can use a string, an integer, or even a floating point value as the index. That index is called the “key,” and the contents within the array at that specific index location is called the “value.” A hash map uses a hash function to generate an index into the table, creating buckets or slots, from which the correct value can be found.
To illustrate, suppose that you’re working with some data that has values associated with strings — for instance, you might have student names and you wish to assign them grades. How would you store this data? Depending on your skill level, you might use multiple arrays during the implementation. For example, in terms of a one dimensional array, if we wanted to access the data for a student located at index #25, we could access it by doing:
studentNames[25]; // do something with the data

studentGrades[25];
Here, we dont have to search through each element in the array to find what we need, we just access it at index #25. The question is, how do we know that index #25 holds the data that we are looking for? If we have a large set of data, not only will keeping track of multiple arrays become tiresome, but doing a sequential search over each item within the separate arrays can become very inefficient. That is where hashing comes in handy. Using a Hash Map, we can use the students name as the “key,” and the students grade as the data “value.” Given this “key” (the students name), we can apply a hash function to map a unique index or bucket within the hash table to find the data “value” (the students grade) that we wish to access.
So in essence, a Hash Map is an extension of a hash table, which is a data structure that stores key/value pairs. Hash tables are typically used because they are ideal for doing a quick search of items.
Though hashing is ideal, it isnt perfect. It is possible for multiple “keys” to be hashed into the same location. Hash “collisions” are practically unavoidable when hashing large data sets. The code demonstrated on this page handles collisions via separate chaining, utilizing an array of linked list head nodes to store multiple keys within one bucket – should any collisions occur.
A special feature of this current hash map class is that its implemented as a multimap, meaning that more than one “value” can be associated with a given “key.” For example, in a student enrollment system where students may be enrolled in multiple classes simultaneously, there might be an association for each enrollment where the “key” is the student ID, and the “value” is the course ID. In this example, if a given student is enrolled in three courses, there will be three associated “values” (course ID’s) for one “key” (student ID) in the Hash Map.
An iterator was also implemented, making data access that much more simple within the hash map class. Click here for an overview demonstrating how custom iterators can be built.
=== CUSTOM TEMPLATE HASH MAP WITH ITERATOR ===
|
1 2 3 4 5 6 7 8 9 10 11 12 13 14 15 16 17 18 19 20 21 22 23 24 25 26 27 28 29 30 31 32 33 34 35 36 37 38 39 40 41 42 43 44 45 46 47 48 49 50 51 52 53 54 55 56 57 58 59 60 61 62 63 64 65 66 67 68 69 70 71 72 73 74 75 76 77 78 79 80 81 82 83 84 85 86 87 88 89 90 91 92 93 94 95 96 97 98 99 100 101 102 103 104 105 106 107 108 109 110 111 112 113 114 115 116 117 118 119 120 121 122 123 124 125 126 127 128 129 130 131 132 133 134 135 136 137 138 139 140 141 142 143 144 145 146 147 148 149 150 151 152 153 154 155 156 157 158 159 160 161 162 163 164 165 166 167 168 169 170 171 172 173 174 175 176 177 178 179 180 181 182 183 184 185 186 187 188 189 190 191 192 193 194 195 196 197 198 199 200 201 202 203 204 205 206 207 208 209 210 211 212 213 214 215 216 217 218 219 220 221 222 223 224 225 226 227 228 229 230 231 232 233 234 235 236 237 238 239 240 241 242 243 244 245 246 247 248 249 250 251 252 253 254 255 256 257 258 259 260 261 262 263 264 265 266 267 268 269 270 271 272 273 274 275 276 277 278 279 280 281 282 283 284 285 286 287 288 289 290 291 292 293 294 295 296 297 298 299 300 301 302 303 304 305 306 307 308 309 310 311 312 313 314 315 316 317 318 319 320 321 322 323 324 325 326 327 328 329 330 331 332 333 334 335 336 337 338 339 340 341 342 343 344 345 346 347 348 349 350 351 352 353 354 355 356 357 358 359 360 361 362 363 364 365 366 367 368 369 370 371 372 373 374 375 376 377 378 379 380 381 382 383 384 385 386 387 388 389 390 391 392 393 394 395 396 397 398 399 400 401 402 403 404 405 406 407 408 409 410 411 412 413 414 415 416 417 418 419 420 421 422 423 424 425 426 427 428 429 430 431 432 433 434 435 436 437 438 439 440 441 442 443 444 445 446 447 448 449 450 451 452 453 454 455 456 457 458 459 460 461 462 463 464 465 466 467 468 469 470 471 472 473 474 475 476 477 478 479 480 481 482 483 484 485 486 487 488 489 |
// ============================================================================ // Author: Kenneth Perkins // Date: June 11, 2013 // Taken From: http://programmingnotes.org/ // File: HashMap.h // Description: This is a class which implements various functions // demonstrating the use of a Hash Map. // ============================================================================ #ifndef TEMPLATE_HASH_MAP #define TEMPLATE_HASH_MAP #include <iostream> #include <string> #include <sstream> #include <cstdlib> // if user doesnt define, this is the // default hash map size const int HASH_SIZE = 350; template <class Key, class Value> class HashMap { public: HashMap(int hashSze = HASH_SIZE); /* Function: Constructor initializes hash map Precondition: None Postcondition: Defines private variables */ bool IsEmpty(int keyIndex); /* Function: Determines whether hash map is empty at the given hash map key index Precondition: Hash map has been created Postcondition: The function = true if the hash map is empty and the function = false if hash map is not empty */ bool IsFull(); /* Function: Determines whether hash map is full Precondition: Hash map has been created Postcondition: The function = true if the hash map is full and the function = false if hash map is not full */ int Hash(Key m_key); /* Function: Computes and returns a hash map key index for a given item The returned key index is the given cell where the item resides Precondition: Hash map has been created and is not full Postcondition: The hash key is returned */ void Insert(Key m_key, Value m_value); /* Function: Adds new item to the back of the list at a given key in the hash map A unique hash key is automatically generated for each new item Precondition: Hash map has been created and is not full Postcondition: Item is in the hash map */ bool Remove(Key m_key, Value deleteItem); /* Function: Removes the first instance from the map whose value is "deleteItem" Precondition: Hash map has been created and is not empty Postcondition: The function = true if deleteItem is found and the function = false if deleteItem is not found */ void Sort(int keyIndex); /* Function: Sort the items in the map at the given hashmap key index Precondition: Hash map has been initialized Postcondition: The hash map is sorted */ int TableSize(); /* Function: Return the size of the hash map Precondition: Hash map has been initialized Postcondition: The size of the hash map is returned */ int TotalElems(); /* Function: Return the total number of elements contained in the hash map Precondition: Hash map has been initialized Postcondition: The size of the hash map is returned */ int BucketSize(int keyIndex); /* Function: Return the number of items contained in the hash map cell at the given hashmap key index Precondition: Hash map has been initialized Postcondition: The size of the given key cell is returned */ int Count(Key m_key, Value searchItem); /* Function: Return the number of times searchItem appears in the map at the given key Precondition: Hash map has been initialized Postcondition: The number of times searchItem appears in the map is returned */ int ContainsKey(Key m_key); /* Function: Return the number of times the given key appears in the hashmap Precondition: Hash map has been initialized Postcondition: The number of times the given key appears in the map is returned */ void MakeEmpty(); /* Function: Initializes hash map to an empty state Precondition: Hash map has been created Postcondition: Hash map no longer exists */ ~HashMap(); /* Function: Removes the hash map Precondition: Hash map has been declared Postcondition: Hash map no longer exists */ // -- ITERATOR CLASS -- class Iterator; /* Function: Class declaration to the iterator Precondition: Hash map has been declared Postcondition: Hash Iterator has been declared */ Iterator begin(int keyIndex){return(!IsEmpty(keyIndex)) ? head[keyIndex]:NULL;} /* Function: Returns the beginning of the current hashmap key index Precondition: Hash map has been declared Postcondition: Hash cell has been returned to the Iterator */ Iterator end(int keyIndex=0){return NULL;} /* Function: Returns the end of the current hashmap key index Precondition: Hash map has been declared Postcondition: Hash cell has been returned to the Iterator */ private: struct KeyValue // struct to hold key/value pairs { Key key; Value value; }; struct node { KeyValue currentItem; node* next; }; node** head; // array of linked list declaration - front of each hash map cell int hashSize; // the size of the hash map (how many cells it has) int totElems; // holds the total number of elements in the entire table int* bucketSize; // holds the total number of elems in each specific hash map cell }; //========================= Implementation ================================// template <class Key, class Value> HashMap<Key, Value>::HashMap(int hashSze) { hashSize = hashSze; head = new node*[hashSize]; bucketSize = new int[hashSize]; for(int x=0; x < hashSize; ++x) { head[x] = NULL; bucketSize[x] = 0; } totElems = 0; }/* End of HashMap */ template <class Key, class Value> bool HashMap<Key, Value>::IsEmpty(int keyIndex) { if(keyIndex >=0 && keyIndex < hashSize) { return head[keyIndex] == NULL; } return true; }/* End of IsEmpty */ template <class Key, class Value> bool HashMap<Key, Value>::IsFull() { try { node* location = new node; delete location; return false; } catch(std::bad_alloc&) { return true; } }/* End of IsFull */ template <class Key, class Value> int HashMap<Key, Value>::Hash(Key m_key) { long h = 19937; std::stringstream convert; // convert the parameter to a string using "stringstream" which is done // so we can hash multiple datatypes using only one function convert << m_key; std::string temp = convert.str(); for(unsigned x=0; x < temp.length(); ++x) { h = (h << 6) ^ (h >> 26) ^ temp[x]; } return abs(h % hashSize); } /* End of Hash */ template <class Key, class Value> void HashMap<Key, Value>::Insert(Key m_key, Value m_value) { if(IsFull()) { //std::cout<<"\nINSERT ERROR - HASH MAP FULL\n"; } else { int keyIndex = Hash(m_key); node* newNode = new node; // add new node newNode-> currentItem.key = m_key; newNode-> currentItem.value = m_value; newNode-> next = NULL; if(IsEmpty(keyIndex)) { head[keyIndex] = newNode; } else { node* temp = head[keyIndex]; while(temp-> next != NULL) { temp = temp-> next; } temp-> next = newNode; } ++bucketSize[keyIndex]; ++totElems; } }/* End of Insert */ template <class Key, class Value> bool HashMap<Key, Value>::Remove(Key m_key, Value deleteItem) { bool isFound = false; node* temp; int keyIndex = Hash(m_key); if(IsEmpty(keyIndex)) { //std::cout<<"\nREMOVE ERROR - HASH MAP EMPTY\n"; } else if(head[keyIndex]->currentItem.key == m_key && head[keyIndex]->currentItem.value == deleteItem) { temp = head[keyIndex]; head[keyIndex] = head[keyIndex]-> next; delete temp; --totElems; --bucketSize[keyIndex]; isFound = true; } else { for(temp = head[keyIndex];temp->next!=NULL;temp=temp->next) { if(temp->next->currentItem.key == m_key && temp->next->currentItem.value == deleteItem) { node* deleteNode = temp->next; temp-> next = temp-> next-> next; delete deleteNode; isFound = true; --totElems; --bucketSize[keyIndex]; break; } } } return isFound; }/* End of Remove */ template <class Key, class Value> void HashMap<Key, Value>::Sort(int keyIndex) { if(IsEmpty(keyIndex)) { //std::cout<<"\nSORT ERROR - HASH MAP EMPTY\n"; } else { int listSize = BucketSize(keyIndex); bool sorted = false; do{ sorted = true; int x = 0; for(node* temp = head[keyIndex]; temp->next!=NULL && x < listSize-1; temp=temp->next,++x) { if(temp-> currentItem.value > temp->next->currentItem.value) { std::swap(temp-> currentItem,temp->next->currentItem); sorted = false; } } --listSize; }while(!sorted); } }/* End of Sort */ template <class Key, class Value> int HashMap<Key, Value>::TableSize() { return hashSize; }/* End of TableSize */ template <class Key, class Value> int HashMap<Key, Value>::TotalElems() { return totElems; }/* End of TotalElems */ template <class Key, class Value> int HashMap<Key, Value>::BucketSize(int keyIndex) { return(!IsEmpty(keyIndex)) ? bucketSize[keyIndex]:0; }/* End of BucketSize */ template <class Key, class Value> int HashMap<Key, Value>::Count(Key m_key, Value searchItem) { int keyIndex = Hash(m_key); int search = 0; if(IsEmpty(keyIndex)) { //std::cout<<"\nCOUNT ERROR - HASH MAP EMPTY\n"; } else { for(node* temp = head[keyIndex];temp!=NULL;temp=temp->next) { if(temp->currentItem.key == m_key && temp->currentItem.value == searchItem) { ++search; } } } return search; }/* End of Count */ template <class Key, class Value> int HashMap<Key, Value>::ContainsKey(Key m_key) { int keyIndex = Hash(m_key); int search = 0; if(IsEmpty(keyIndex)) { //std::cout<<"\nCONTAINS KEY ERROR - HASH MAP EMPTY\n"; } else { for(node* temp = head[keyIndex];temp!=NULL;temp=temp->next) { if(temp->currentItem.key == m_key) { ++search; } } } return search; }/* End of ContainsKey */ template <class Key, class Value> void HashMap<Key, Value>::MakeEmpty() { totElems = 0; for(int x=0; x < hashSize; ++x) { if(!IsEmpty(x)) { //std::cout << "Destroying nodes ...\n"; while(!IsEmpty(x)) { node* temp = head[x]; //std::cout << temp-> currentItem.value <<std::endl; head[x] = head[x]-> next; delete temp; } } bucketSize[x] = 0; } }/* End of MakeEmpty */ template <class Key, class Value> HashMap<Key, Value>::~HashMap() { MakeEmpty(); delete[] head; delete[] bucketSize; }/* End of ~HashMap */ // END OF THE HASH MAP CLASS // ----------------------------------------------------------- // START OF THE HASH MAP ITERATOR CLASS template <class Key, class Value> class HashMap<Key, Value>::Iterator : public std::iterator<std::forward_iterator_tag,Value>, public HashMap<Key, Value> { public: // Iterator constructor Iterator(node* otherIter = NULL) { itHead = otherIter; } ~Iterator() {} // The assignment and relational operators are straightforward Iterator& operator=(const Iterator& other) { itHead = other.itHead; return(*this); } bool operator==(const Iterator& other)const { return itHead == other.itHead; } bool operator!=(const Iterator& other)const { return itHead != other.itHead; } bool operator<(const Iterator& other)const { return itHead < other.itHead; } bool operator>(const Iterator& other)const { return other.itHead < itHead; } bool operator<=(const Iterator& other)const { return (!(other.itHead < itHead)); } bool operator>=(const Iterator& other)const { return (!(itHead < other.itHead)); } // Update my state such that I refer to the next element in the // HashMap. Iterator operator+(int incr) { node* temp = itHead; for(int x=0; x < incr && temp!= NULL; ++x) { temp = temp->next; } return temp; } Iterator operator+=(int incr) { for(int x=0; x < incr && itHead!= NULL; ++x) { itHead = itHead->next; } return itHead; } Iterator& operator++() // pre increment { if(itHead != NULL) { itHead = itHead->next; } return(*this); } Iterator operator++(int) // post increment { node* temp = itHead; this->operator++(); return temp; } KeyValue& operator[](int incr) { // Return "junk" data // to prevent the program from crashing if(itHead == NULL || (*this + incr) == NULL) { return junk; } return(*(*this + incr)); } // Return a reference to the value in the node. I do this instead // of returning by value so a caller can update the value in the // node directly. KeyValue& operator*() { // Return "junk" data // to prevent the program from crashing if(itHead == NULL) { return junk; } return itHead->currentItem; } KeyValue* operator->() { return(&**this); } private: node* itHead; KeyValue junk; }; #endif // http://programmingnotes.org/ |
QUICK NOTES:
The highlighted lines are sections of interest to look out for.
The iterator class starts on line #381, and is built to support most of the standard relational operators, as well as arithmetic operators such as ‘+,+=,++’ (pre/post increment). The * (star), bracket [] and -> arrow operators are also supported. Click here for an overview demonstrating how custom iterators can be built.
The rest of the code is heavily commented, so no further insight is necessary. If you have any questions, feel free to leave a comment below.
===== DEMONSTRATION HOW TO USE =====
Use of the above template class is the same as many of its STL template class counterparts. Here are sample programs demonstrating its use.
|
1 2 3 4 5 6 7 8 9 10 11 12 13 14 15 16 17 18 19 20 21 22 23 24 25 26 27 28 29 30 31 32 33 34 35 36 37 38 39 40 41 42 43 44 45 46 47 48 49 50 51 52 53 54 55 56 57 58 59 60 61 62 63 64 65 66 67 68 69 70 71 72 73 74 75 76 77 78 79 80 81 82 83 84 85 86 87 88 89 90 91 92 93 94 95 96 97 98 99 100 101 102 103 104 |
// DEMONSTRATE BASIC USE AND THE REMOVE / SORT FUNCTIONS #include <iostream> #include <string> #include "HashMap.h" using namespace std; // iterator declaration typedef HashMap<string, int>::Iterator iterDec; int main() { // declare variables HashMap<string, int> hashMap; // place items into the hash map using the 'insert' function // NOTE: its OK for dupicate keys to be inserted into the hash map hashMap.Insert("BIOL", 585); hashMap.Insert("CPSC", 386); hashMap.Insert("ART", 101); hashMap.Insert("CPSC", 462); hashMap.Insert("HIST", 251); hashMap.Insert("CPSC", 301); hashMap.Insert("MATH", 270); hashMap.Insert("PE", 145); hashMap.Insert("BIOL", 134); hashMap.Insert("GEOL", 201); hashMap.Insert("CIS", 465); hashMap.Insert("CPSC", 240); hashMap.Insert("GEOL", 101); hashMap.Insert("MATH", 150); hashMap.Insert("DANCE", 134); hashMap.Insert("CPSC", 131); hashMap.Insert("ART", 345); hashMap.Insert("CHEM", 185); hashMap.Insert("PE", 125); hashMap.Insert("CPSC", 120); // display the number of times the key "CPSC" appears in the hashmap cout<<"The key 'CPSC' appears in the hash map "<< hashMap.ContainsKey("CPSC")<<" time(s)\n"; // declare an iterator for the "CPSC" key so we can display data to screen iterDec it = hashMap.begin(hashMap.Hash("CPSC")); // display the first value cout<<"\nThe first item with the key 'CPSC' is: " <<it[0].value<<endl; // display all the values in the hash map whose key matches "CPSC" // NOTE: its possible for multiple different keys types // to be placed into the same hash map bucket cout<<"\nThese are all the items in the hash map whose key is 'CPSC': \n"; for(int x=0; x < hashMap.BucketSize(hashMap.Hash("CPSC")); ++x) { if(it[x].key == "CPSC") // make sure this is the key we are looking for { cout<<" Key-> "<<it[x].key<<"\tValue-> "<<it[x].value<<endl; } } // remove the first value from the key "CPSC" cout<<"\n[REMOVE THE VALUE '"<<it[0].value<<"' FROM THE KEY '"<<it[0].key<<"']\n"; hashMap.Remove("CPSC",it[0].value); // display the number of times the key "CPSC" appears in the hashmap cout<<"\nNow the key 'CPSC' only appears in the hash map "<< hashMap.ContainsKey("CPSC")<<" time(s)\n"; // update the iterator to the current hash map state it = hashMap.begin(hashMap.Hash("CPSC")); // sort the values in the hash map bucket whose key is "CSPC" hashMap.Sort(hashMap.Hash("CPSC")); // display the values whose key matches "CPSC" cout<<"\nThese are the sorted items in the hash map whose key is 'CPSC': \n"; for(int x=0; x < hashMap.BucketSize(hashMap.Hash("CPSC")); ++x) { if(it[x].key == "CPSC") { cout<<" Key-> "<<it[x].key<<"\tValue-> "<<it[x].value<<endl; } } // display all the key/values in the entire hash map cout<<"\nThese are all of the items in the entire hash map: \n"; for(int x=0; x < hashMap.TableSize(); ++x) { if(!hashMap.IsEmpty(x)) { for(iterDec iter = hashMap.begin(x); iter != hashMap.end(x); ++iter) { cout<<" Key-> "<<(*iter).key<<"\tValue-> "<<iter->value<<endl; } cout<<endl; } } // display the total number of items in the hash map cout<<"The total number of items in the hash map is: "<< hashMap.TotalElems()<<endl; return 0; }// http://programmingnotes.org/ |
SAMPLE OUTPUT:
The key 'CPSC' appears in the hash map 6 time(s)The first item with the key 'CPSC' is: 386
These are all the items in the hash map whose key is 'CPSC':
Key-> CPSC Value-> 386
Key-> CPSC Value-> 462
Key-> CPSC Value-> 301
Key-> CPSC Value-> 240
Key-> CPSC Value-> 131
Key-> CPSC Value-> 120[REMOVE THE VALUE '386' FROM THE KEY 'CPSC']
Now the key 'CPSC' only appears in the hash map 5 time(s)
These are the sorted items in the hash map whose key is 'CPSC':
Key-> CPSC Value-> 120
Key-> CPSC Value-> 131
Key-> CPSC Value-> 240
Key-> CPSC Value-> 301
Key-> CPSC Value-> 462These are all of the items in the entire hash map:
Key-> CIS Value-> 465Key-> DANCE Value-> 134
Key-> PE Value-> 145
Key-> PE Value-> 125Key-> MATH Value-> 270
Key-> MATH Value-> 150Key-> GEOL Value-> 201
Key-> GEOL Value-> 101Key-> CPSC Value-> 120
Key-> CPSC Value-> 131
Key-> CPSC Value-> 240
Key-> CPSC Value-> 301
Key-> CPSC Value-> 462Key-> BIOL Value-> 585
Key-> BIOL Value-> 134Key-> ART Value-> 101
Key-> ART Value-> 345Key-> CHEM Value-> 185
Key-> HIST Value-> 251
The total number of items in the hash map is: 19
|
1 2 3 4 5 6 7 8 9 10 11 12 13 14 15 16 17 18 19 20 21 22 23 24 25 26 27 28 29 30 31 32 33 34 35 36 37 38 39 40 41 42 43 44 45 46 47 48 49 50 51 52 53 54 55 56 57 58 59 60 61 62 63 64 65 66 67 68 69 70 71 72 73 74 75 76 77 78 79 80 81 82 83 84 85 86 87 88 89 90 91 92 93 94 95 96 97 98 99 100 101 102 103 104 105 106 107 108 109 110 111 112 113 114 115 116 117 118 119 120 121 122 123 124 125 126 127 128 129 130 131 132 133 134 135 136 137 138 139 140 141 142 143 144 145 146 147 148 149 150 151 152 153 154 155 156 157 158 159 |
// DISPLAY ALL DATA INSIDE HASH MAP USING STD::STRING / INT / DOUBLE / STRUCT #include <iostream> #include <string> #include "HashMap.h" using namespace std; // sample struct demo struct MyStruct { string car; int year; double mpg; // struct comparison operators // used for 'remove' function bool operator == (const MyStruct& rhs)const { return car == rhs.car && year == rhs.year && mpg == rhs.mpg; } // used for 'sort' function bool operator > (const MyStruct& rhs)const { return car > rhs.car; } };// end of MyStruct // iterator declaration typedef HashMap<string, MyStruct>::Iterator iterDec; int main() { // declare variables MyStruct access; HashMap<string, MyStruct> hashMap(10); // --- initialize data for car #1 --- access.car = "Ford Fusion"; access.year = 2006; access.mpg = 28.5; hashMap.Insert("Kenneth",access); // --- initialize data for car #2 --- access.car = "BMW 535i"; access.year = 2014; access.mpg = 25.4; hashMap.Insert("Kenneth",access); // --- initialize data for car #3 --- access.car = "Nissan Altima"; access.year = 2011; access.mpg = 30.7; hashMap.Insert("Jessica",access); // --- initialize data for car #4 --- access.car = "Acura Integra"; access.year = 2001; access.mpg = 20.2; hashMap.Insert("Kenneth",access); // diplay how many cars "Kenneth" owns cout <<"'Kenneth' owns "<<hashMap.ContainsKey("Kenneth")<<" cars"<<endl; // display all items in the hash map // NOTE: its possible for multiple different keys types // to be placed into the same hash map bucket cout<<"\nThese are all of the cars in the hash map: \n"; for(int x=0; x < hashMap.TableSize(); ++x) { if(!hashMap.IsEmpty(x)) { // initialize an iterator iterDec iter = hashMap.begin(x); // display the key cout<<(*iter).key<<"'s car(s)\n"; // display all the values for(;iter != hashMap.end(x); ++iter) { cout<<"\tCar: "<<iter->value.car <<"\n\tYear: "<<iter->value.year <<"\n\tMPG: "<<iter->value.mpg<<endl<<endl; } } } // display the number of items in the hash map cout<<"The total number of cars in the hash map is: "<< hashMap.TotalElems()<<endl; // sort the cars that "Kenneth" owns by name cout<<"\nSorting the cars that 'Kenneth' owns by name.. \n"; hashMap.Sort(hashMap.Hash("Kenneth")); // display all items in the hash map again cout<<"\nAgain, these are all of the cars in the hash map: \n"; for(int x=0; x < hashMap.TableSize(); ++x) { if(!hashMap.IsEmpty(x)) { // initialize an iterator iterDec iter = hashMap.begin(x); // display the key cout<<iter->key<<"'s car(s)\n"; // display all the values for(;iter != hashMap.end(x); ++iter) { cout<<"\tCar: "<<(*iter).value.car <<"\n\tYear: "<<(*iter).value.year <<"\n\tMPG: "<<(*iter).value.mpg<<endl<<endl; } } } // remove the car 'Acura Integra' from "Kenneth's" inventory for(iterDec iter = hashMap.begin(hashMap.Hash("Kenneth")); iter != hashMap.end(hashMap.Hash("Kenneth")); ++iter) { if(iter->value.car == "Acura Integra") { cout<<"'"<<iter->value.car<<"' has been removed from 'Kenneth's' inventory..\n"; hashMap.Remove("Kenneth",(*iter).value); break; } } // display how many cars "Kenneth" owns cout <<"\n'Kenneth' now owns only "<<hashMap.ContainsKey("Kenneth")<<" cars"<<endl; // display all items in the hash map one more time cout<<"\nThese are all of the cars in the hash map with the 'Acura Integra' removed: \n"; for(int x=0; x < hashMap.TableSize(); ++x) { if(!hashMap.IsEmpty(x)) { // initialize an iterator iterDec iter = hashMap.begin(x); // display the key cout<<(*iter).key<<"'s car(s)\n"; // display all the values for(;iter != hashMap.end(x); ++iter) { cout<<"\tCar: "<<iter->value.car <<"\n\tYear: "<<iter->value.year <<"\n\tMPG: "<<iter->value.mpg<<endl<<endl; } } } // display the number of items in the hash map cout<<"The total number of cars in the hash map is: "<< hashMap.TotalElems()<<endl; return 0; }// http://programmingnotes.org/ |
SAMPLE OUTPUT:
'Kenneth' owns 3 carsThese are all of the cars in the hash map:
Jessica's car(s)
Car: Nissan Altima
Year: 2011
MPG: 30.7Kenneth's car(s)
Car: Ford Fusion
Year: 2006
MPG: 28.5Car: BMW 535i
Year: 2014
MPG: 25.4Car: Acura Integra
Year: 2001
MPG: 20.2
-----------------------------------------------------The total number of cars in the hash map is: 4
Sorting the cars that 'Kenneth' owns by name..
Again, these are all of the cars in the hash map:
Jessica's car(s)
Car: Nissan Altima
Year: 2011
MPG: 30.7Kenneth's car(s)
Car: Acura Integra
Year: 2001
MPG: 20.2Car: BMW 535i
Year: 2014
MPG: 25.4Car: Ford Fusion
Year: 2006
MPG: 28.5
-----------------------------------------------------'Acura Integra' has been removed from 'Kenneth's' inventory..
'Kenneth' now owns only 2 cars
These are all of the cars in the hash map with the 'Acura Integra' removed:
Jessica's car(s)
Car: Nissan Altima
Year: 2011
MPG: 30.7Kenneth's car(s)
Car: BMW 535i
Year: 2014
MPG: 25.4Car: Ford Fusion
Year: 2006
MPG: 28.5
-----------------------------------------------------The total number of cars in the hash map is: 3
C++ || Custom Template Hash Table With Iterator Using Separate Chaining
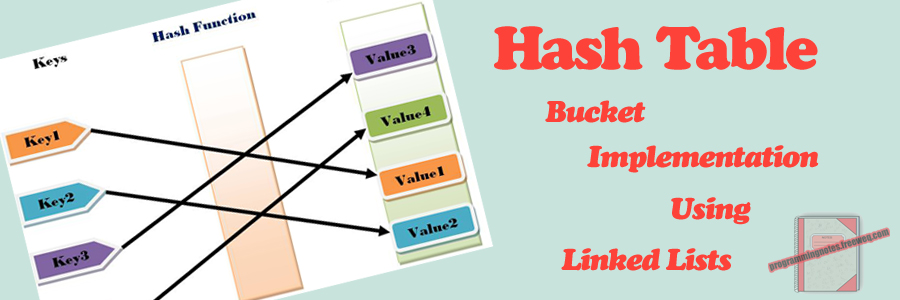
Looking for sample code for a Hash Map? Click here!
Before we get into the code, what is a Hash Table? Simply put, a Hash Table is a data structure used to implement an associative array; one that can map unique “keys” to specific values. While a standard array requires that indice subscripts be integers, a hash table can use a floating point value, a string, another array, or even a structure as the index. That index is called the “key,” and the contents within the array at that specific index location is called the value. A hash table uses a hash function to generate an index into the table, creating buckets or slots, from which the correct value can be found.
To illustrate, compare a standard array full of data (100 elements). If the position was known for the specific item that we wanted to access within the array, we could quickly access it. For example, if we wanted to access the data located at index #5 in the array, we could access it by doing:
array[5]; // do something with the data
Here, we dont have to search through each element in the array to find what we need, we just access it at index #5. The question is, how do we know that index #5 stores the data that we are looking for? If we have a large set of data, doing a sequential search over each item within the array can be very inefficient. That is where hashing comes in handy. Given a “key,” we can apply a hash function to a unique index or bucket to find the data that we wish to access.
So in essence, a hash table is a data structure that stores key/value pairs, and is typically used because they are ideal for doing a quick search of items.
Though hashing is ideal, it isnt perfect. It is possible for multiple items to be hashed into the same location. Hash “collisions” are practically unavoidable when hashing large data sets. The code demonstrated on this page handles collisions via separate chaining, utilizing an array of linked list head nodes to store multiple values within one bucket – should any collisions occur.
An iterator was also implemented, making data access that much more simple within the hash table class. Click here for an overview demonstrating how custom iterators can be built.
Looking for sample code for a Hash Map? Click here!
=== CUSTOM TEMPLATE HASH TABLE WITH ITERATOR ===
|
1 2 3 4 5 6 7 8 9 10 11 12 13 14 15 16 17 18 19 20 21 22 23 24 25 26 27 28 29 30 31 32 33 34 35 36 37 38 39 40 41 42 43 44 45 46 47 48 49 50 51 52 53 54 55 56 57 58 59 60 61 62 63 64 65 66 67 68 69 70 71 72 73 74 75 76 77 78 79 80 81 82 83 84 85 86 87 88 89 90 91 92 93 94 95 96 97 98 99 100 101 102 103 104 105 106 107 108 109 110 111 112 113 114 115 116 117 118 119 120 121 122 123 124 125 126 127 128 129 130 131 132 133 134 135 136 137 138 139 140 141 142 143 144 145 146 147 148 149 150 151 152 153 154 155 156 157 158 159 160 161 162 163 164 165 166 167 168 169 170 171 172 173 174 175 176 177 178 179 180 181 182 183 184 185 186 187 188 189 190 191 192 193 194 195 196 197 198 199 200 201 202 203 204 205 206 207 208 209 210 211 212 213 214 215 216 217 218 219 220 221 222 223 224 225 226 227 228 229 230 231 232 233 234 235 236 237 238 239 240 241 242 243 244 245 246 247 248 249 250 251 252 253 254 255 256 257 258 259 260 261 262 263 264 265 266 267 268 269 270 271 272 273 274 275 276 277 278 279 280 281 282 283 284 285 286 287 288 289 290 291 292 293 294 295 296 297 298 299 300 301 302 303 304 305 306 307 308 309 310 311 312 313 314 315 316 317 318 319 320 321 322 323 324 325 326 327 328 329 330 331 332 333 334 335 336 337 338 339 340 341 342 343 344 345 346 347 348 349 350 351 352 353 354 355 356 357 358 359 360 361 362 363 364 365 366 367 368 369 370 371 372 373 374 375 376 377 378 379 380 381 382 383 384 385 386 387 388 389 390 391 392 393 394 395 396 397 398 399 400 401 402 403 404 405 406 407 408 409 410 411 412 413 414 415 416 417 418 419 420 421 422 423 424 425 426 427 428 429 430 431 432 433 434 435 436 437 438 439 440 441 442 443 444 445 446 447 448 449 450 451 452 453 454 455 456 457 458 459 460 461 462 463 464 465 466 467 468 469 470 471 472 473 474 475 476 |
// ============================================================================ // Author: Kenneth Perkins // Date: Jan 18, 2013 // Taken From: http://programmingnotes.org/ // File: HashTable.h // Description: This is a class which implements various functions which // demonstrates the use of a Hash Table. // ============================================================================ #ifndef TEMPLATE_HASH_TABLE #define TEMPLATE_HASH_TABLE #include <iostream> #include <string> #include <sstream> #include <cstdlib> // if user doesnt define, this is the // default hash table size const int HASH_SIZE = 100; template <class ItemType> class HashTable { public: HashTable(int hashSze = HASH_SIZE); /* Function: Constructor initializes hash table Precondition: None Postcondition: Defines private variables */ bool IsEmpty(int key); /* Function: Determines whether hash table is empty at the given key Precondition: Hash table has been created Postcondition: The function = true if the hash table is empty and the function = false if hash table is not empty */ bool IsFull(); /* Function: Determines whether hash table is full Precondition: Hash table has been created Postcondition: The function = true if the hash table is full and the function = false if hash table is not full */ int Hash(ItemType newItem); /* Function: Computes and returns a unique hash key for a given item The returned key is the given cell where the item resides Precondition: Hash table has been created and is not full Postcondition: The hash key is returned */ void Insert(ItemType newItem); /* Function: Adds newItem to the back of the list at a given key in the hash table A unique hash key is automatically generated for each newItem Precondition: Hash table has been created and is not full Postcondition: Item is in the hash table */ void Append(int key, ItemType newItem); /* Function: Adds new item to the end of the list at a given key in the hash table Precondition: Hash table has been created and is not full Postcondition: Item is in the hash table */ bool Remove(ItemType deleteItem, int key = -1); /* Function: Removes the first instance from the table whose value is "deleteItem" Optional second parameter indicates the key where deleteItem is located Precondition: Hash table has been created and is not empty Postcondition: The function = true if deleteItem is found and the function = false if deleteItem is not found */ void Sort(int key); /* Function: Sort the items in the table at the given key Precondition: Hash table has been initialized Postcondition: The hash table is sorted */ int TableSize(); /* Function: Return the size of the hash table Precondition: Hash table has been initialized Postcondition: The size of the hash table is returned */ int TotalElems(); /* Function: Return the total number of elements contained in the hash table Precondition: Hash table has been initialized Postcondition: The size of the hash table is returned */ int BucketSize(int key); /* Function: Return the number of items contained in the hash table cell at the given key Precondition: Hash table has been initialized Postcondition: The size of the given key cell is returned */ int Count(ItemType searchItem); /* Function: Return the number of times searchItem appears in the table. Only works on items located in their correctly hashed cells Precondition: Hash table has been initialized Postcondition: The number of times searchItem appears in the table is returned */ void MakeEmpty(); /* Function: Initializes hash table to an empty state Precondition: Hash table has been created Postcondition: Hash table no longer exists */ ~HashTable(); /* Function: Removes the hash table Precondition: Hash table has been declared Postcondition: Hash table no longer exists */ // -- ITERATOR CLASS -- class Iterator; /* Function: Class declaration to the iterator Precondition: Hash table has been declared Postcondition: Hash Iterator has been declared */ Iterator begin(int key){return(!IsEmpty(key)) ? head[key]:NULL;} /* Function: Returns the beginning of the current hash cell list Precondition: Hash table has been declared Postcondition: Hash cell has been returned to the Iterator */ Iterator end(int key=0){return NULL;} /* Function: Returns the end of the current hash cell list Precondition: Hash table has been declared Postcondition: Hash cell has been returned to the Iterator */ private: struct node { ItemType currentItem; node* next; }; node** head; // array of linked list declaration - front of each hash table cell int hashSize; // the size of the hash table (how many cells it has) int totElems; // holds the total number of elements in the entire table int* bucketSize; // holds the total number of elems in each specific hash table cell }; //========================= Implementation ================================// template<class ItemType> HashTable<ItemType>::HashTable(int hashSze) { hashSize = hashSze; head = new node*[hashSize]; bucketSize = new int[hashSize]; for(int x=0; x < hashSize; ++x) { head[x] = NULL; bucketSize[x] = 0; } totElems = 0; }/* End of HashTable */ template<class ItemType> bool HashTable<ItemType>::IsEmpty(int key) { if(key >=0 && key < hashSize) { return head[key] == NULL; } return true; }/* End of IsEmpty */ template<class ItemType> bool HashTable<ItemType>::IsFull() { try { node* location = new node; delete location; return false; } catch(std::bad_alloc&) { return true; } }/* End of IsFull */ template<class ItemType> int HashTable<ItemType>::Hash(ItemType newItem) { long h = 19937; std::stringstream convert; // convert the parameter to a string using "stringstream" which is done // so we can hash multiple datatypes using only one function convert << newItem; std::string temp = convert.str(); for(unsigned x=0; x < temp.length(); ++x) { h = (h << 6) ^ (h >> 26) ^ temp[x]; } return abs(h % hashSize); } /* End of Hash */ template<class ItemType> void HashTable<ItemType>::Insert(ItemType newItem) { if(IsFull()) { //std::cout<<"nINSERT ERROR - HASH TABLE FULLn"; } else { int key = Hash(newItem); Append(key,newItem); } }/* End of Insert */ template<class ItemType> void HashTable<ItemType>::Append(int key, ItemType newItem) { if(IsFull()) { //std::cout<<"nAPPEND ERROR - HASH TABLE FULLn"; } else { node* newNode = new node; // adds new node newNode-> currentItem = newItem; newNode-> next = NULL; if(IsEmpty(key)) { head[key] = newNode; } else { node* tempPtr = head[key]; while(tempPtr-> next != NULL) { tempPtr = tempPtr-> next; } tempPtr-> next = newNode; } ++bucketSize[key]; ++totElems; } }/* End of Append */ template<class ItemType> bool HashTable<ItemType>::Remove(ItemType deleteItem, int key) { bool isFound = false; node* tempPtr; if(key == -1) { key = Hash(deleteItem); } if(IsEmpty(key)) { //std::cout<<"nREMOVE ERROR - HASH TABLE EMPTYn"; } else if(head[key]->currentItem == deleteItem) { tempPtr = head[key]; head[key] = head[key]-> next; delete tempPtr; --totElems; --bucketSize[key]; isFound = true; } else { for(tempPtr = head[key];tempPtr->next!=NULL;tempPtr=tempPtr->next) { if(tempPtr->next->currentItem == deleteItem) { node* deleteNode = tempPtr->next; tempPtr-> next = tempPtr-> next-> next; delete deleteNode; isFound = true; --totElems; --bucketSize[key]; break; } } } return isFound; }/* End of Remove */ template<class ItemType> void HashTable<ItemType>::Sort(int key) { if(IsEmpty(key)) { //std::cout<<"nSORT ERROR - HASH TABLE EMPTYn"; } else { int listSize = BucketSize(key); bool sorted = false; do{ sorted = true; int x = 0; for(node* tempPtr = head[key]; tempPtr->next!=NULL && x < listSize-1; tempPtr=tempPtr->next,++x) { if(tempPtr-> currentItem > tempPtr->next->currentItem) { ItemType temp = tempPtr-> currentItem; tempPtr-> currentItem = tempPtr->next->currentItem; tempPtr->next->currentItem = temp; sorted = false; } } --listSize; }while(!sorted); } }/* End of Sort */ template<class ItemType> int HashTable<ItemType>::TableSize() { return hashSize; }/* End of TableSize */ template<class ItemType> int HashTable<ItemType>::TotalElems() { return totElems; }/* End of TotalElems */ template<class ItemType> int HashTable<ItemType>::BucketSize(int key) { return(!IsEmpty(key)) ? bucketSize[key]:0; }/* End of BucketSize */ template<class ItemType> int HashTable<ItemType>::Count(ItemType searchItem) { int key = Hash(searchItem); int search = 0; if(IsEmpty(key)) { //std::cout<<"nCOUNT ERROR - HASH TABLE EMPTYn"; } else { for(node* tempPtr = head[key];tempPtr!=NULL;tempPtr=tempPtr->next) { if(tempPtr->currentItem == searchItem) { ++search; } } } return search; }/* End of Count */ template<class ItemType> void HashTable<ItemType>::MakeEmpty() { totElems = 0; for(int x=0; x < hashSize; ++x) { if(!IsEmpty(x)) { //std::cout << "Destroying nodes ...n"; while(!IsEmpty(x)) { node* temp = head[x]; //std::cout << temp-> currentItem <<std::endl; head[x] = head[x]-> next; delete temp; } } bucketSize[x] = 0; } }/* End of MakeEmpty */ template<class ItemType> HashTable<ItemType>::~HashTable() { MakeEmpty(); delete[] head; delete[] bucketSize; }/* End of ~HashTable */ // END OF THE HASH TABLE CLASS // ----------------------------------------------------------- // START OF THE HASH TABLE ITERATOR CLASS template <class ItemType> class HashTable<ItemType>::Iterator : public std::iterator<std::forward_iterator_tag,ItemType>, public HashTable<ItemType> { public: // Iterator constructor Iterator(node* otherIter = NULL) { itHead = otherIter; } ~Iterator() {} // The assignment and relational operators are straightforward Iterator& operator=(const Iterator& other) { itHead = other.itHead; return(*this); } bool operator==(const Iterator& other)const { return itHead == other.itHead; } bool operator!=(const Iterator& other)const { return itHead != other.itHead; } bool operator<(const Iterator& other)const { return itHead < other.itHead; } bool operator>(const Iterator& other)const { return other.itHead < itHead; } bool operator<=(const Iterator& other)const { return (!(other.itHead < itHead)); } bool operator>=(const Iterator& other)const { return (!(itHead < other.itHead)); } // Update my state such that I refer to the next element in the // HashTable. Iterator operator+(int incr) { node* temp = itHead; for(int x=0; x < incr && temp!= NULL; ++x) { temp = temp->next; } return temp; } Iterator operator+=(int incr) { for(int x=0; x < incr && itHead!= NULL; ++x) { itHead = itHead->next; } return itHead; } Iterator& operator++() // pre increment { if(itHead != NULL) { itHead = itHead->next; } return(*this); } Iterator operator++(int) // post increment { node* temp = itHead; this->operator++(); return temp; } ItemType& operator[](int incr) { // Return "junk" data // to prevent the program from crashing if(itHead == NULL || (*this + incr) == NULL) { return junk; } return(*(*this + incr)); } // Return a reference to the value in the node. I do this instead // of returning by value so a caller can update the value in the // node directly. ItemType& operator*() { // Return "junk" data // to prevent the program from crashing if(itHead == NULL) { return junk; } return itHead->currentItem; } ItemType* operator->() { return(&**this); } private: node* itHead; ItemType junk; }; #endif // http://programmingnotes.org/ |
QUICK NOTES:
The highlighted lines are sections of interest to look out for.
The iterator class starts on line #368, and is built to support most of the standard relational operators, as well as arithmetic operators such as ‘+,+=,++’ (pre/post increment). The * (star), bracket [] and -> arrow operators are also supported. Click here for an overview demonstrating how custom iterators can be built.
The rest of the code is heavily commented, so no further insight is necessary. If you have any questions, feel free to leave a comment below.
Looking for sample code for a Hash Map? Click here!
===== DEMONSTRATION HOW TO USE =====
Use of the above template class is the same as many of its STL template class counterparts. Here are sample programs demonstrating its use.
|
1 2 3 4 5 6 7 8 9 10 11 12 13 14 15 16 17 18 19 20 21 22 23 24 25 26 27 28 29 30 31 32 33 34 35 36 37 38 39 40 41 42 43 44 45 46 47 48 49 50 51 52 53 54 55 56 57 58 59 60 61 62 63 64 65 66 67 68 69 70 71 72 73 74 75 76 77 78 79 80 81 82 83 84 85 86 |
// DEMONSTRATE USE OF THE REMOVE AND SORT FUNCTIONS #include <iostream> #include <ctime> #include <string> #include <cstdlib> #include <iomanip> #include "HashTable.h" using namespace std; // iterator declarations typedef HashTable<string>::Iterator strIterDec; // hash table size const int TABLE_SIZE = 5; int main() { // delcare variables srand(time(NULL)); const string names[]={"Alva","Edda","Hiram","Lemuel","Della","Roseann","Sang", "Evelia","Claire","Marylou","Magda","Irvin","Reagan","Deb","Hillary", "Tuyetm","Cherilyn","Amina","Justin","Neville","Jessica","Demi", "Graham","Cinderella","Freddy","Vivan","Marjorie","Krystal","Liza", "Spencer","Jordon","Bernie","Geraldine","Kati","Jetta","Carmella", "Chery","Earlene","Gene","Lorri","Albertina","Ula","Karena","Johanna", "Alex","Tobias","Lashawna","Domitila","Chantel","Deneen","Nigel", "Lashanda","Donn","Theda","Many","Jeramy","Jodee","Tamra","Dessie", "Lawrence","Jaime","Basil","Roger","Cythia","Homer","Lilliam","Victoria", "Tod","Harley","Meghann","Jacquelyne","Arie","Rosemarie","Lyndon","Blanch", "Kenneth","Perkins","Kaleena"}; int nameLen = sizeof(names)/sizeof(names[0]); // Hash table class declarations HashTable<string> strHash(TABLE_SIZE); // insert 10 items into each hash table for(int x=0; x < (TABLE_SIZE*2); ++x) { // place all data in bucket 0 // NOTE: you dont want to place all data into one // bucket, this is done for demo purposes only // Normally use the "Insert" function instead strHash.Append(0,names[rand()%(nameLen-1)]); } // assign the iterator to bucket 0 strIterDec it = strHash.begin(0); // display bucket size cout<<"Bucket #0 has "<<strHash.BucketSize(0)<<" items"<<endl; // display the first item cout<<"The first element in bucket #0 is "<< it[0] <<endl; // remove the first item in bucket 0 // NOTE: the second parameter is optional // but since we know we want bucket 0, we use it here strHash.Remove(it[0],0); // update the iterator to the new table state it = strHash.begin(0); // display the new first item cout<<"nNow bucket #0 has "<<strHash.BucketSize(0)<<" items"<<endl; cout<<"The first element in bucket #0 is "<< it[0] <<endl; // display all the items within the "strHash" table cout<<"nThe unsorted items in strHash bucket #0:n"; for(int x=0; x < strHash.BucketSize(0); ++x) { cout << "it[] = " << it[x] << endl; } // sort the items in bucket 0 strHash.Sort(0); // display all the items within the "strHash" table cout<<"nThe sorted items in strHash bucket #0:n"; for(int x=0; x < strHash.BucketSize(0); ++x) { cout << "it[] = " << it[x] << endl; } return 0; }// http://programmingnotes.org/ |
SAMPLE OUTPUT:
Bucket #0 has 10 items

The first element in bucket #0 is Homer
Now bucket #0 has 9 items
The first element in bucket #0 is TamraThe unsorted items in strHash bucket #0:
it[] = Tamra
it[] = Lyndon
it[] = Johanna
it[] = Perkins
it[] = Alva
it[] = Jordon
it[] = Neville
it[] = Lawrence
it[] = JettaThe sorted items in strHash bucket #0:
it[] = Alva
it[] = Jetta
it[] = Johanna
it[] = Jordon
it[] = Lawrence
it[] = Lyndon
it[] = Neville
it[] = Perkins
it[] = Tamra
|
1 2 3 4 5 6 7 8 9 10 11 12 13 14 15 16 17 18 19 20 21 22 23 24 25 26 27 28 29 30 31 32 33 34 35 36 37 38 39 40 41 42 43 44 45 46 47 48 49 50 51 52 53 54 55 56 57 58 59 60 61 62 63 64 65 66 67 68 69 70 71 72 73 74 75 76 77 78 79 80 81 82 83 84 85 86 87 88 89 90 91 92 93 94 95 96 97 98 99 100 101 102 103 104 105 106 107 108 109 110 111 112 113 114 115 116 117 118 119 120 121 122 |
// DISPLAY ALL DATA INSIDE TABLE USING STD::STRING / INT / STRUCT #include <iostream> #include <ctime> #include <string> #include <cstdlib> #include <iomanip> #include "HashTable.h" using namespace std; // sample struct demo struct MyStruct { string name; }; // iterator declarations typedef HashTable<string>::Iterator strIterDec; typedef HashTable<int>::Iterator intIterDec; typedef HashTable<MyStruct>::Iterator strctIterDec; // hash table size const int TABLE_SIZE = 10; int main() { // delcare variables srand(time(NULL)); const string names[]={"Alva","Edda","Hiram","Lemuel","Della","Roseann","Sang", "Evelia","Claire","Marylou","Magda","Irvin","Reagan","Deb","Hillary", "Tuyetm","Cherilyn","Amina","Justin","Neville","Jessica","Demi", "Graham","Cinderella","Freddy","Vivan","Marjorie","Krystal","Liza", "Spencer","Jordon","Bernie","Geraldine","Kati","Jetta","Carmella", "Chery","Earlene","Gene","Lorri","Albertina","Ula","Karena","Johanna", "Alex","Tobias","Lashawna","Domitila","Chantel","Deneen","Nigel", "Lashanda","Donn","Theda","Many","Jeramy","Jodee","Tamra","Dessie", "Lawrence","Jaime","Basil","Roger","Cythia","Homer","Lilliam","Victoria", "Tod","Harley","Meghann","Jacquelyne","Arie","Rosemarie","Lyndon","Blanch", "Kenneth","Perkins","Kaleena"}; int nameLen = sizeof(names)/sizeof(names[0]); // Hash table class declarations HashTable<string> strHash(TABLE_SIZE); HashTable<int> intHash = TABLE_SIZE; HashTable<MyStruct> strctHash = TABLE_SIZE; // access struct element MyStruct strctAccess; // insert 20 items into each hash table for(int x=0; x < (TABLE_SIZE*2); ++x) { // Use the "insert" function to place data into the hash table // this function automatically hashes the basic datatypes // i.e: int, double, char, char*, string strHash.Insert(names[rand()%(nameLen-1)]); intHash.Insert(rand()%10000); // The "insert" function cant be used on a struct, so we // use the "append" function for the struct declaration. // We use the "strHash" class declaration to use its // hash function, then place the struct in an appropriate // hashed bucket strctAccess.name = names[rand()%(nameLen-1)]; int strctHashKey = strHash.Hash(strctAccess.name); strctHash.Append(strctHashKey,strctAccess); } // display all the items within the "strHash" table for(int x=0; x < strHash.TableSize(); ++x) { if(!strHash.IsEmpty(x)) { cout<<"nstrHash Bucket #"<<x<<":n"; for(strIterDec it = strHash.begin(x); it != strHash.end(x); it+=1) { // access elements using the * (star) operator cout << "*it = " << *it << endl; } } } // creates a line seperator cout<<endl; cout.fill('-'); cout<<left<<setw(80)<<""<<endl; // display all the items within the "intHash" table for(int x=0; x < intHash.TableSize(); ++x) { intIterDec it = intHash.begin(x); if(!intHash.IsEmpty(x)) { cout<<"nintHash Bucket #"<<x<<":n"; for(int y = 0; y < intHash.BucketSize(x); ++y) { // access elements using the [] operator cout << "it[] = " << it[y] << endl; } } } // creates a line seperator cout<<endl; cout.fill('-'); cout<<left<<setw(80)<<""<<endl; // display all the items within the "strctHash" table for(int x=0; x < strctHash.TableSize(); ++x) { if(!strctHash.IsEmpty(x)) { cout<<"nstrctHash Bucket #"<<x<<":n"; for(strctIterDec it = strctHash.begin(x); it!=strctHash.end(x); it=it+1) { // access struct/class elements using the -> operator cout << "it-> = " << it->name << endl; } } } return 0; }// http://programmingnotes.org/ |
SAMPLE OUTPUT:
strHash Bucket #0:

*it = Cinderella

*it = Perkins

*it = Krystal

*it = Roger

*it = Roger
strHash Bucket #1:
*it = Lilliam
*it = Lilliam
*it = ThedastrHash Bucket #2:
*it = AriestrHash Bucket #3:
*it = MagdastrHash Bucket #6:
*it = Edda
*it = Irvin
*it = Kati
*it = LyndonstrHash Bucket #7:
*it = Deb
*it = JaimestrHash Bucket #8:
*it = Neville
*it = VictoriastrHash Bucket #9:
*it = Chery
*it = Evelia--------------------------------------------
intHash Bucket #0:
it[] = 2449
it[] = 6135intHash Bucket #1:
it[] = 1120
it[] = 852intHash Bucket #2:
it[] = 5727intHash Bucket #3:
it[] = 1174intHash Bucket #4:
it[] = 2775
it[] = 3525
it[] = 8375intHash Bucket #5:
it[] = 4322
it[] = 8722
it[] = 5016intHash Bucket #6:
it[] = 5053
it[] = 7231
it[] = 1571intHash Bucket #7:
it[] = 1666
it[] = 4510
it[] = 1548
it[] = 3646intHash Bucket #9:
it[] = 2756--------------------------------------------
strctHash Bucket #0:
it-> = Cherilyn
it-> = RogerstrctHash Bucket #1:
it-> = Tamra
it-> = Alex
it-> = ThedastrctHash Bucket #2:
it-> = Nigel
it-> = Alva
it-> = AriestrctHash Bucket #4:
it-> = BasilstrctHash Bucket #5:
it-> = TodstrctHash Bucket #6:
it-> = Irvin
it-> = LyndonstrctHash Bucket #7:
it-> = Amina
it-> = Hillary
it-> = Kenneth
it-> = AminastrctHash Bucket #8:
it-> = Gene
it-> = Lemuel
it-> = GenestrctHash Bucket #9:
it-> = Albertina
JavaScript/CSS/HTML || sliderRadioButton.js – Simple Animated Slider Radio Button Using Vanilla JavaScript
Radio buttons let a user select only one of a limited number of choices. Radio buttons are normally presented in radio groups (a collection of radio buttons describing a set of related options). Only one radio button in a group can be selected at the same time.
Using JavaScript, the following is sample code which demonstrates how to display a simple animated slider radio button group to the page.
This animated slider radio button comes with a few basic features. When a selection is chosen, a sliding animation appears. The speed of the animation can be modified via CSS transitions. The look and orientation can also be modified via CSS, with the button group direction being either vertical or horizontal.
Contents
1. Basic Usage

2. Slider HTML - Default

3. Slider HTML - Column

4. sliderRadioButton.js & CSS Source

5. More Examples
1. Basic Usage
Syntax is very straightforward. The following demonstrates the JavaScript used to setup the radio buttons decorated with the ‘slider’ CSS class.
|
1 2 3 4 5 6 7 8 |
// Initialize slider. <script> document.addEventListener("DOMContentLoaded", function(eventLoaded) { // Initialize slider Slider.init(); }); </script> |
2. Slider HTML – Default
The following is an example of the HTML used to display the slider. By default, the options are displayed inline.
|
1 2 3 4 5 6 7 8 9 10 11 12 13 14 15 16 17 18 19 20 |
<!-- // HTML --> <!-- Radio Group --> <div class="slider-radio-group"> <!-- Option 1 --> <input type="radio" class="slider-radio-button" id="rdoSole" value="Solé" name="rdoGroupName"> <label class="slider-option-label" for="rdoSole">Solé</label> <!-- Option 2 --> <input type="radio" class="slider-radio-button" id="rdoLynn" value="Lynn" name="rdoGroupName"> <label class="slider-option-label" for="rdoLynn">Lynn</label> <!-- Option 3 --> <input type="radio" class="slider-radio-button" id="rdoJennifer" value="Jennifer" name="rdoGroupName"> <label class="slider-option-label" for="rdoJennifer">Jennifer</label> <!-- Option 4 --> <input type="radio" class="slider-radio-button" id="rdoKenneth" value="Kenneth" name="rdoGroupName"> <label class="slider-option-label" for="rdoKenneth">Kenneth</label> </div> |
Sample:

3. Slider HTML – Column
The following is an example of the HTML used to display the slider as a column.
|
1 2 3 4 5 6 7 8 9 10 11 12 13 14 15 16 17 18 19 20 21 22 23 24 |
<!-- // HTML --> <!-- Radio Group --> <div class="slider-radio-group column"> <!-- Option 1 --> <input type="radio" class="slider-radio-button" id="rdoRed" value="Red" name="rdoGroupColor"> <label class="slider-option-label" for="rdoRed">Red</label> <!-- Option 2 --> <input type="radio" class="slider-radio-button" id="rdoBlue" value="Blue" name="rdoGroupColor"> <label class="slider-option-label" for="rdoBlue">Blue</label> <!-- Option 3 --> <input type="radio" class="slider-radio-button" id="rdoBlack" value="Black" name="rdoGroupColor"> <label class="slider-option-label" for="rdoBlack">Black</label> <!-- Option 4 --> <input type="radio" class="slider-radio-button" id="rdoYellow" value="Yellow" name="rdoGroupColor"> <label class="slider-option-label" for="rdoYellow">Yellow</label> <!-- Option 5 --> <input type="radio" class="slider-radio-button" id="rdoPurple" value="Purple" name="rdoGroupColor"> <label class="slider-option-label" for="rdoPurple">Purple</label> </div> |
Sample:

4. sliderRadioButton.js & CSS Source
The following is the sliderRadioButton.js Namespace & CSS Source. Include this in your project to start using!
|
1 2 3 4 5 6 7 8 9 10 11 12 13 14 15 16 17 18 19 20 21 22 23 24 25 26 27 28 29 30 31 32 33 34 35 36 37 38 39 40 41 42 43 44 45 46 47 48 49 50 51 52 53 54 55 56 57 58 59 60 61 62 63 64 65 66 67 68 69 70 71 72 73 74 75 76 77 78 79 80 81 82 83 84 85 86 87 88 89 90 91 92 93 94 95 96 97 98 99 100 101 102 103 104 105 106 107 108 109 110 111 112 113 114 115 116 117 118 119 120 121 122 123 124 125 126 127 128 129 130 131 132 133 134 135 136 137 138 139 140 141 142 143 144 145 146 147 148 149 150 151 152 153 154 155 156 157 158 159 160 161 162 163 164 165 166 167 168 169 170 171 172 173 174 175 176 177 178 179 180 181 182 183 184 185 186 187 188 189 190 191 192 193 194 195 196 197 198 199 200 201 202 203 204 205 206 207 208 209 210 211 212 213 214 215 216 217 218 219 220 221 222 223 224 225 226 227 228 229 230 231 232 233 234 235 236 237 238 239 240 241 242 243 244 245 246 247 248 249 250 251 252 253 254 255 256 257 258 259 260 261 262 263 264 265 266 267 268 269 270 271 272 273 274 275 276 277 278 279 280 281 282 283 284 285 286 287 288 289 290 291 292 293 294 295 296 297 298 299 300 301 302 |
// ============================================================================ // Author: Kenneth Perkins // Date: Jun 12, 2020 // Taken From: http://programmingnotes.org/ // File: sliderRadioButton.js // Description: Javascript that handles the animation for a slider radio // button. // ============================================================================ /** * NAMESPACE: Slider * USE: Handles the sliding animation for the Slider Radio Button. */ var Slider = Slider || {}; (function(namespace) { 'use strict'; // -- Public data -- // Property to hold public variables and functions let exposed = namespace; // Set class names and other shared data const settings = { classNameRadioGroup: '.slider-radio-group', classNameRadioButton: '.slider-radio-button', classNameRadioButtonLabel: 'slider-option-label', classNameSelectedItem: '.slider-selected-item', classNameRadioColumn: '.column', classNameLabelContent: '.slider-option-label-content', clean: (str) => { return str ? str.trim().replace('.', '') : ''; } }; exposed.settings = settings; /** * FUNCTION: init * USE: Initializes the slider radio groups and button clicks. * @param element: JavaScript element to search for radio groups * @return: N/A. */ exposed.init = (element = document) => { exposed.prepareRadioGroups(element); addClickEvents(element); } /** * FUNCTION: animate * USE: Handles the sliding animation of a radio button. * @param radioButton: JavaScript element (radio button) that the * slider animation should be applied to. * @return: N/A. */ exposed.animate = (radioButton) => { if (!radioButton) { throw new Error('Radio button does not exist!'); } // Get the radio group for this button and make sure it exists let radioGroup = exposed.getGroupForButton(radioButton); if (!radioGroup) { throw new Error('Unable to find radio group!'); } // Get the radio button label and make sure it exists let radioButtonLabel = exposed.getLabelForButton(radioButton, radioGroup); if (!radioButtonLabel) { throw new Error('Unable to find radio option label!'); } // Get the "selected item" slider div that marks the // label as selected and make sure it exists let selectedItem = exposed.getSelectedItem(radioGroup); if (!selectedItem) { throw new Error('Unable to find selected item slider animation element!'); } // Mark the option label as selected markAsSelected(radioButtonLabel, selectedItem); } /** * FUNCTION: prepareRadioGroups * USE: Makes sure radio groups contain the "selected item" slider div * and makes sure radio column groups are set up properly * @param element: JavaScript element to search for radio groups * @return: N/A. */ exposed.prepareRadioGroups = (element = document) => { // Get radio groups and make sure it exists let radioGroups = exposed.getRadioGroups(element); if (!radioGroups) { throw new Error('Unable to find a radio group!'); } // Go through radio groups and make sure they are setup properly for (const radioGroup of radioGroups) { // Make sure the "selected item" slider div exists. Add it in if it does not let selectedItemElement = exposed.getSelectedItem(radioGroup); if (!selectedItemElement) { selectedItemElement = document.createElement('div'); selectedItemElement.classList.add(settings.clean(settings.classNameSelectedItem)); radioGroup.appendChild(selectedItemElement); } // Get radio buttons for this group and make sure it exists let radioButtons = exposed.getRadioButtons(radioGroup); if (!radioButtons) { continue; } let classRadioColumn = settings.clean(settings.classNameRadioColumn); for (const radioButton of radioButtons) { // Check to see if this radio group is marked as a "column". If it is, // also add the associated class to its linked radio button elements if (radioGroup.classList.contains(classRadioColumn) && !radioButton.classList.contains(classRadioColumn)) { radioButton.classList.add(classRadioColumn); } let radioButtonLabel = exposed.getLabelForButton(radioButton, radioGroup); if (!radioButtonLabel) { continue; } let container = document.createElement('div'); container.classList.add(settings.clean(settings.classNameLabelContent)); while (radioButtonLabel.hasChildNodes()) { container.appendChild(radioButtonLabel.firstChild); } radioButtonLabel.appendChild(container); } } } /** * FUNCTION: getRadioGroups * USE: Returns the radio groups that are descendants of the object on * which this method was called. * @param element: JavaScript element to search for radio groups * @return: Radio group descendants found in the given element. */ exposed.getRadioGroups = (element = document) => { return element.querySelectorAll(settings.classNameRadioGroup); } /** * FUNCTION: getRadioButtons * USE: Returns the radio buttons that are descendants of the object on * which this method was called. * @param element: JavaScript element to search for radio buttons * @return: Radio button descendants found in the given element. */ exposed.getRadioButtons = (element = document) => { return element.querySelectorAll(settings.classNameRadioButton); } /** * FUNCTION: getGroupForButton * USE: Returns the radio group that is a parent of * the object on which this method was called. * @param radioButton: JavaScript element representing the radio button * @return: Radio button label descendant found in the given element. */ exposed.getGroupForButton = (radioButton) => { return radioButton.closest(settings.classNameRadioGroup); } /** * FUNCTION: getLabelForButton * USE: Returns the radio button label that is a descendant of * the object on which this method was called. * @param radioButton: JavaScript element representing the radio button * @param element: JavaScript parent element of the radio button * @return: Radio button label descendant found in the given element. */ exposed.getLabelForButton = (radioButton, element = document) => { return element.querySelector('label[for="' + radioButton.id + '"]'); } /** * FUNCTION: getSelectedItem * USE: Returns the "selected item" div for the object on which this * method was called. * @param element: JavaScript element to search for the "selected item" * @return: The "selected item" div found in the given element. */ exposed.getSelectedItem = (element = document) => { return element.querySelector(settings.classNameSelectedItem); } /** * FUNCTION: getSelectedRadioButton * USE: Returns the selected (checked) radio button that is * descendant of the object on which this method was called. * @param element: JavaScript element to search for radio buttons * @return: Selected radio button descendant found in the given element. */ exposed.getSelectedRadioButton = (element = document) => { let selectedButton = null; let buttons = exposed.getRadioButtons(element); for (const button of buttons) { if (button.checked) { selectedButton = button; break; } } return selectedButton; } // -- Private data -- /** * FUNCTION: addClickEvents * USE: Adds slider animation button click events for the radio buttons. * @param element: JavaScript element to search for radio groups * @return: N/A. */ let addClickEvents = (element = document) => { // Go through each radio button to initialize any that are selected/set button clicks exposed.getRadioButtons(element).forEach((radioButton, index) => { // If the radio button is checked, animate the selection if (radioButton.checked) { exposed.animate(radioButton); } // Add click events to update the selected radio button radioButton.addEventListener('click', (eventClick) => { exposed.animate(radioButton); }); }); } /** * FUNCTION: markAsSelected * USE: Marks the radio button label as "selected" and performs * the slider animation by moving the "selected item" div to * the location of the radio button label. * @param radioButtonLabel: JavaScript element (label) linked to the selected radio button * @param selectedItem: JavaScript element (div) for "selected item" * @return: N/A. */ let markAsSelected = (radioButtonLabel, selectedItem) => { let radioButtonLabelCoords = getElementCoords(radioButtonLabel, true); moveElement(selectedItem, radioButtonLabelCoords); selectedItem.style.display = 'block'; } /** * FUNCTION: moveElement * USE: Moves an element to a specific location and resizes it * to a specific size. * @param element: JavaScript element to move * @param coords: Coordinates to move & resize the element to * @return: N/A. */ let moveElement = (element, coords) => { element.style.left = coords.x + 'px'; element.style.top = coords.y + 'px'; element.style.width = coords.width + 'px'; element.style.height = coords.height + 'px'; } /** * FUNCTION: getElementCoords * USE: Gets the coordinates & size of an element. * @param element: JavaScript element in question * @param roundUp: Determines if element coordinates should * be rounded up or not * @return: The coordinates of the element in question. */ let getElementCoords = (element, roundUp = true) => { const boundingRect = element.getBoundingClientRect(); let coords = { x: element.offsetLeft, y: element.offsetTop, width: boundingRect.width, height: boundingRect.height } if (roundUp) { for (const prop in coords) { let item = coords[prop]; if (isNumber(item)) { coords[prop] = Math.ceil(item); } } } return coords; } let isNumber = (n) => { return !isNaN(parseFloat(n)) && !isNaN(n - 0) } (function (factory) { if (typeof define === 'function' && define.amd) { define([], factory); } else if (typeof exports === 'object') { module.exports = factory(); } }(function() { return namespace; })); }(Slider)); // http://programmingnotes.org/ |
The following is sliderRadioButton.css.
|
1 2 3 4 5 6 7 8 9 10 11 12 13 14 15 16 17 18 19 20 21 22 23 24 25 26 27 28 29 30 31 32 33 34 35 36 37 38 39 40 41 42 43 44 45 46 47 48 49 50 51 52 53 54 55 56 57 58 59 60 61 62 63 64 65 66 67 68 69 70 71 72 73 74 75 76 77 78 79 |
/* // ============================================================================ // Author: Kenneth Perkins // Date: Jun 12, 2020 // Taken From: http://programmingnotes.org/ // File: sliderRadioButton.css // Description: CSS that handles the animation for a slider radio // button. // ============================================================================ */ @import url('https://fonts.googleapis.com/css?family=Roboto'); .slider-radio-group { border: solid 1px #bdbdbd; margin: 5px; border-radius: 10px; overflow: hidden; width: 420px; position: relative; font-family: roboto; display: flex; justify-content: center; align-items: center; } .slider-radio-group.column { width: 100px; flex-direction: column; } .slider-radio-button { visibility: hidden; display: none; } .slider-radio-button.column { } input[type=radio][class*="slider-radio-button" i]:checked + label { background-color: rgba(117, 190, 218, .3); } input[type=radio][class*="slider-radio-button" i]:not(:first-child) + label { border-left: solid 1px lightgrey; } input[type=radio][class*="slider-radio-button column" i]:not(:first-child) + label { border-top: solid 1px lightgrey; } .slider-option-label { display: inline-block; cursor: pointer; padding: 5px; width: 110px; text-align:center; background-color: #f3f4f4; overflow: hidden; box-sizing: border-box; } .slider-option-label:hover { background-color: #eef6fa; } .slider-option-label-content { position: relative; z-index: 1; } .slider-selected-item { cursor: pointer; position: absolute; transition: all 400ms ease-in-out; background-color: rgba(117, 190, 218, .25); display:none; } /* // http://programmingnotes.org/ */ |
5. More Examples
Below are more examples demonstrating the use of ‘sliderRadioButton.js‘. Don’t forget to include the module when running the examples!
|
1 2 3 4 5 6 7 8 9 10 11 12 13 14 15 16 17 18 19 20 21 22 23 24 25 26 27 28 29 30 31 32 33 34 35 36 37 38 39 40 41 42 43 44 45 46 47 48 49 50 51 52 53 54 55 56 57 58 59 60 61 62 63 64 65 66 67 68 69 70 71 72 73 74 75 76 77 78 79 80 81 82 83 84 85 86 87 88 89 90 91 92 93 94 95 96 97 98 99 100 101 102 103 104 105 106 107 108 109 110 111 112 113 114 115 116 117 118 119 120 121 122 123 124 125 126 127 128 129 130 131 132 133 134 135 136 137 138 139 140 141 142 143 144 145 146 147 148 149 150 151 152 153 154 155 156 157 158 159 160 161 162 163 164 165 166 167 168 169 170 171 172 173 174 175 176 177 178 179 180 181 182 183 |
<!-- // ============================================================================ // Author: Kenneth Perkins // Date: Jun 12, 2020 // Taken From: http://programmingnotes.org/ // File: sliderRadioButtonDemo.html // Description: Demonstrates how to display a simple animated // slider radio button to the page. // ============================================================================ --> <!DOCTYPE html> <html> <head> <meta charset="utf-8"/> <title>My Programming Notes Simple Animated Slider Radio Button Demo</title> <style> .button { padding: 8px; background-color: #d2d2d2; height:100%; text-align:center; text-decoration:none; color:black; display: flex; justify-content: center; align-items: center; flex-direction: column; border-radius: 15px; cursor: pointer; } .button.medium { height:18px; width:80px; } .section-header { margin-top: 20px; text-align:center; font-size: 15px; font-weight: bold; font-style: italic; font-family: Tahoma,helvetica,arial,sans-serif; } .inline { display:inline-block; } .main { text-align:center; margin-left:auto; margin-right:auto; } .emoji { font-size:13px } </style> <!-- // Include module --> <link type="text/css" rel="stylesheet" href="./sliderRadioButton.css"> <script type="text/javascript" src="./sliderRadioButton.js"></script> </head> <body> <div class="main"> <div class="inline" style="margin: 5px;"> <div> <div class="section-header"> Rate Our Service </div> <!-- Radio Group 1 --> <div class="slider-radio-group"> <!-- Option 1 --> <input type="radio" class="slider-radio-button" id="rdoOneStar" value="1" name="rdoGroupRatings"> <label class="slider-option-label" for="rdoOneStar"><span class="emoji">⭐</span></label> <!-- Option 2 --> <input type="radio" class="slider-radio-button" id="rdoTwoStar" value="2" name="rdoGroupRatings"> <label class="slider-option-label" for="rdoTwoStar"><span class="emoji">⭐⭐</span></label> <!-- Option 3 --> <input type="radio" class="slider-radio-button" id="rdoThreeStar" value="3" name="rdoGroupRatings"> <label class="slider-option-label" for="rdoThreeStar"><span class="emoji">⭐⭐⭐</span></label> <!-- Option 4 --> <input type="radio" class="slider-radio-button" id="rdoFourStar" value="4" name="rdoGroupRatings"> <label class="slider-option-label" for="rdoFourStar"><span class="emoji">⭐⭐⭐⭐</span></label> </div> </div> <div> <div class="section-header"> Favorite Name </div> <!-- Radio Group 2 --> <div class="slider-radio-group"> <!-- Option 1 --> <input type="radio" class="slider-radio-button" id="rdoSole" value="Solé" name="rdoGroupName"> <label class="slider-option-label" for="rdoSole">Solé</label> <!-- Option 2 --> <input type="radio" class="slider-radio-button" id="rdoLynn" value="Lynn" name="rdoGroupName"> <label class="slider-option-label" for="rdoLynn">Lynn</label> <!-- Option 3 --> <input type="radio" class="slider-radio-button" id="rdoJennifer" value="Jennifer" name="rdoGroupName"> <label class="slider-option-label" for="rdoJennifer">Jennifer</label> <!-- Option 4 --> <input type="radio" class="slider-radio-button" id="rdoKenneth" value="Kenneth" name="rdoGroupName"> <label class="slider-option-label" for="rdoKenneth">Kenneth</label> </div> </div> <div class="inline"> <div class="section-header"> Favorite Color </div> <!-- Radio Group 3 --> <div class="slider-radio-group column"> <!-- Option 1 --> <input type="radio" class="slider-radio-button" id="rdoRed" value="Red" name="rdoGroupColor"> <label class="slider-option-label" for="rdoRed">Red</label> <!-- Option 2 --> <input type="radio" class="slider-radio-button" id="rdoBlue" value="Blue" name="rdoGroupColor"> <label class="slider-option-label" for="rdoBlue">Blue</label> <!-- Option 3 --> <input type="radio" class="slider-radio-button" id="rdoBlack" value="Black" name="rdoGroupColor"> <label class="slider-option-label" for="rdoBlack">Black</label> <!-- Option 4 --> <input type="radio" class="slider-radio-button" id="rdoYellow" value="Yellow" name="rdoGroupColor"> <label class="slider-option-label" for="rdoYellow">Yellow</label> <!-- Option 5 --> <input type="radio" class="slider-radio-button" id="rdoPurple" value="Purple" name="rdoGroupColor"> <label class="slider-option-label" for="rdoPurple">Purple</label> </div> </div> <div class="button section-header" id="btnSelect"> Select </div> </div> </div> <script> document.addEventListener("DOMContentLoaded", function(eventLoaded) { // Make sure the radio group is setup with the selected option slider div and other options // And add button clicks to animate the radio button slider Slider.init(); // Select button click document.querySelector('#btnSelect').addEventListener('click', function(eventClick) { let radioButtons = Slider.getRadioButtons(); let optionSelected = false; if (radioButtons) { for (const radioButton of radioButtons) { if (radioButton.checked) { alert(radioButton.id + ' is checked. Its value is: ' + radioButton.value); optionSelected = true; } } } if (!optionSelected) { alert('Please select an option!'); } }); }); </script> </body> </html><!-- // http://programmingnotes.org/ --> |
QUICK NOTES:
The highlighted lines are sections of interest to look out for.
The code is heavily commented, so no further insight is necessary. If you have any questions, feel free to leave a comment below.


